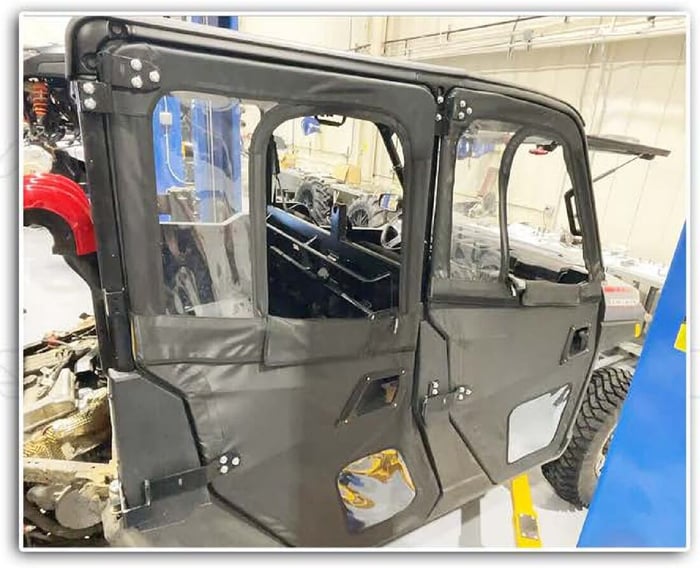
Polaris Ranger Crew Seizmik Framed Door Kit Installation Guide (52-06026)

Table of Contents
✓ 2020–2027 Ranger Crew 1000 — Standard, Premium, EPS
✗ 2018 Ranger Crew — old body style, see below
✗ Round-tube cage full size Rangers
✗ Ranger XP 900 Crew
✗ Ranger XD 1500
Shop the Ranger Crew Framed Door Kit — Part 52-06026 →
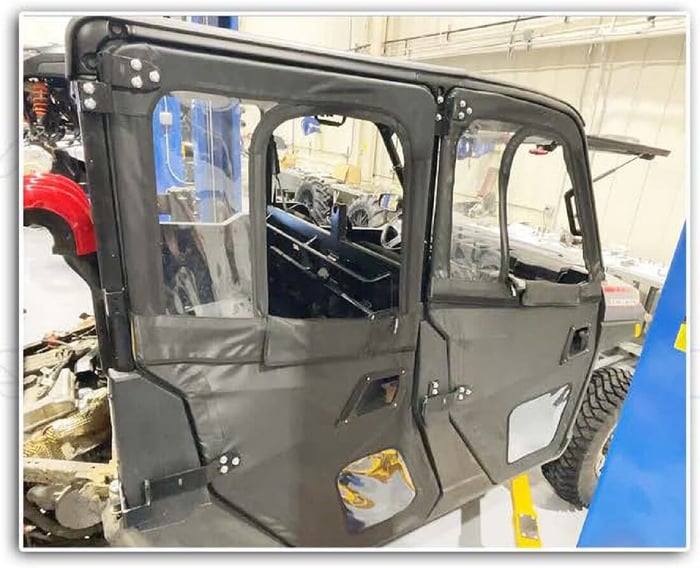
Seizmik 52-06026 — all four doors on a Ranger Crew XP 1000.
Seizmik ships this kit as two boxes with two separate instruction sheets, and neither one covers the whole job. This guide puts all four doors in one sequence, front and rear, in the order that actually works on the machine.
Nothing gets fully tightened until the door is hanging and latching. Every bracket in this kit — striker, upper hinge, lower hinge — mounts in slots so it can move, and that movement is the entire adjustment range you have. Snug things enough to hold position and no further. You will tighten everything at the end, once.
This is the one that costs people an evening. On a Crew, the front doors mount using brackets 19 through 22 from the 52-06025 rear box. The equivalent brackets in the 52-06024 front box — items 6, 7, 13 and 14 — are for a two-seat machine and go unused here. Set them aside before you start so you cannot grab the wrong ones.
A 2018 Ranger Crew is the old body style and this kit will not fit it. Polaris redesigned the 3-seat XP 1000 body for 2018 but did not redesign the Crew until 2019, when it grew an inch and a half wider. So "2018 Ranger XP 1000" means two different machines depending on seat count. If you are on a 2018 Crew, call us before you order anything.
Before You Start
Required Tools
- Rubber mallet
- 12mm and 14mm sockets
- Adjustable wrench
- Phillips screwdriver
- Torx bit wrench
- Sharp knife or razor — for slitting the textile at the hinges
- Punch — for marking the mirror holes
- Rubbing alcohol — for the weatherstrip surface
- Flat head screwdriver — for the plastic trim rivets, if your machine never had doors
What Is In The Boxes
Each door is built from four pieces: an upper textile, a lower textile, an upper frame and a lower frame. You assemble them. Sixteen pieces of door plus the brackets, and the frames are handed left and right.
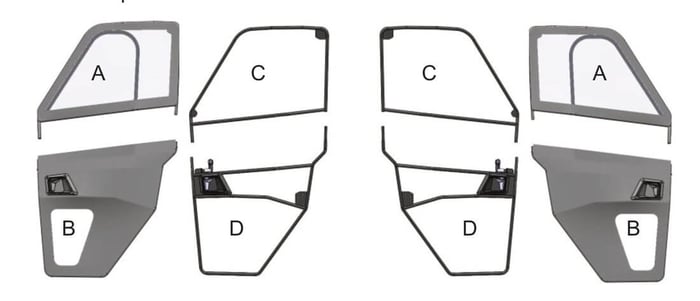
A and B are the textiles, C and D the frame halves — per door.
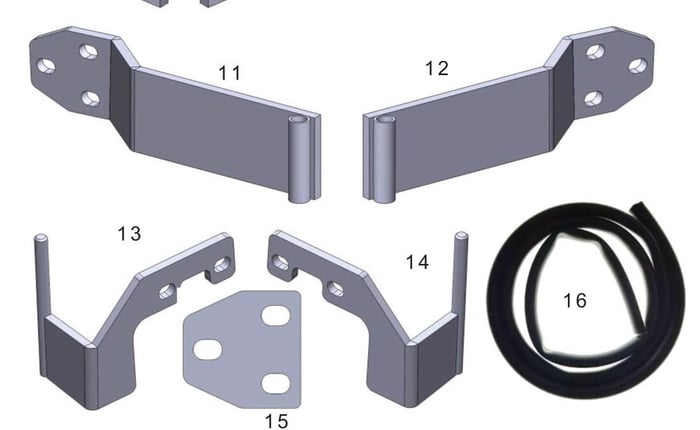
Hinge plates, mounts, door spacers and the bulb gasket.
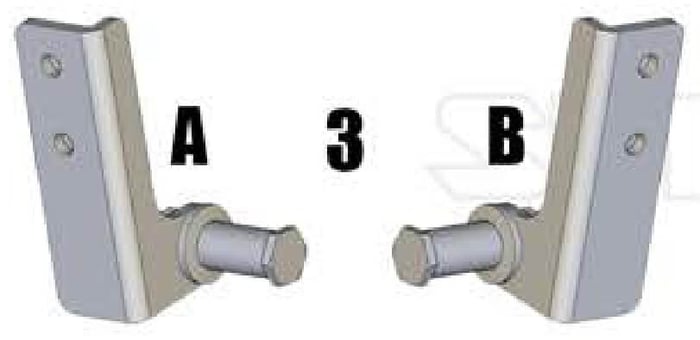
Striker bolt assemblies — handed, driver and passenger.
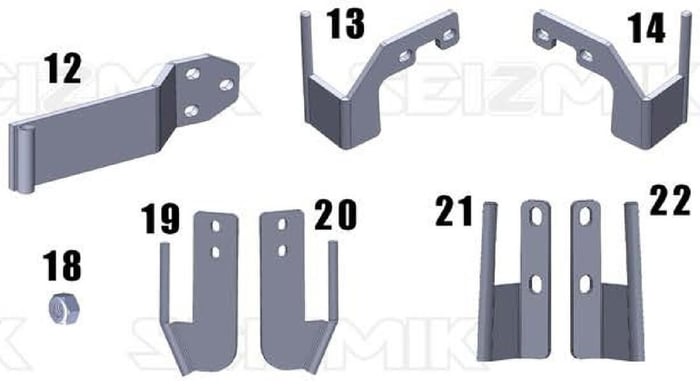
Items 19–22 here are the front door brackets — from the rear box.
Part 1 — Brackets On The Machine
All photos and instructions below are for one side. Everything repeats on the other.
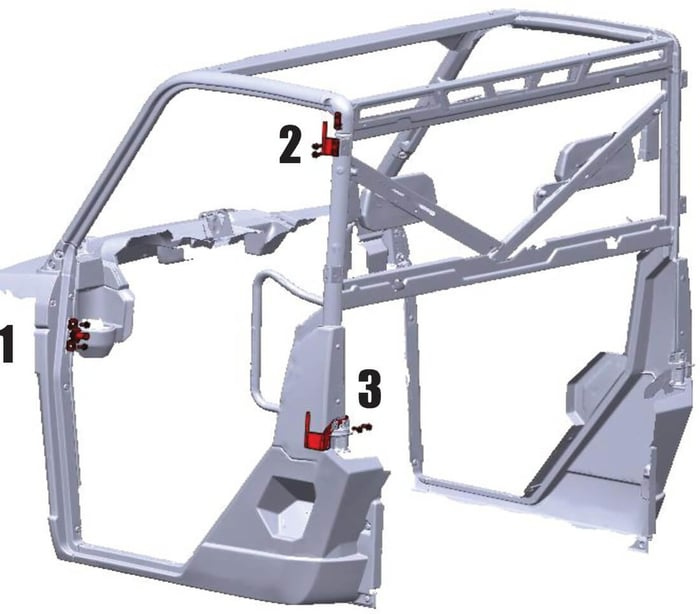
The three mounting points: striker (1), upper hinge (2), lower hinge (3).
1 Front striker bolt, at the cup holder
Two threaded holes sit near the cup holder. Mount the striker bolt assembly with two M8x20 flange bolts and leave them loose — this is the part you will move later to set how hard the door has to be pushed to seal.
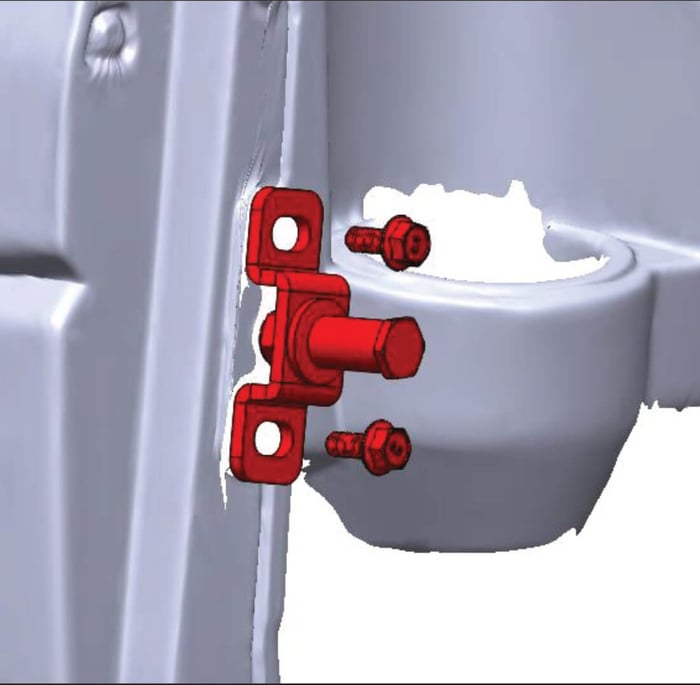
Front striker at the cup holder. Loose for now.
2 Trim the plastic — only if your machine never had doors
Look at the plastic panel at the lower front of the door opening. If you can already see threaded holes in it, skip this entirely. If you cannot, that panel has to come off and get a hole cut in it using the template in the kit.
Pull the bolts and rivets along the inside and outside of the plastic with a Torx driver and a flat head. Keep every rivet and bolt — they go back in. With the plastic off you can see the bracket underneath and mark where to cut. The trim does not have to be neat; the metal bracket covers it.
3 Front upper hinge bracket
Slide the upper hinge backing plate into the bracket welded to the upper rear of the roll cage, weld nuts facing the vehicle. Holding it there, bolt the upper hinge bracket on with the bend facing out, two M8x20 flange bolts. Loose.
Remember: on a Crew this bracket is item 21 or 22 from the rear box, not the one in the front box.

Backing plate drops into the welded cage bracket.
4 Front lower hinge bracket — lift the bed
Tilt the cargo bed up. Two threaded holes sit in the lower rear location shown in the reference image. Bolt the lower hinge bracket on with two M8x20 flange bolts, hinge facing the rear of the vehicle. Loose.
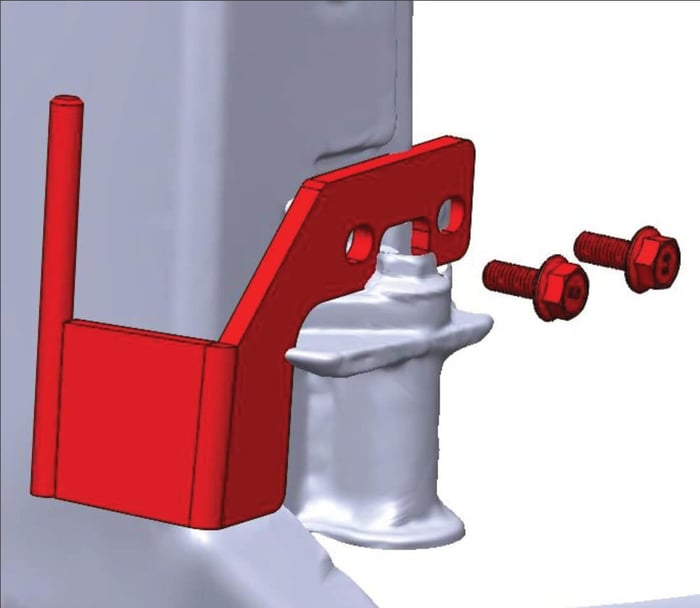
Lower hinge bracket, reached with the bed tilted.
5 Rear striker bolt, behind the front seat
Two threaded holes directly behind the front passenger seat. Striker bolt on with two M8x20 flange bolts, loose. Install the top bolt first and hold its nut with a wrench — it is far easier than fighting both at once. If you have aftermarket accessories in there you may need to trim plastic back.
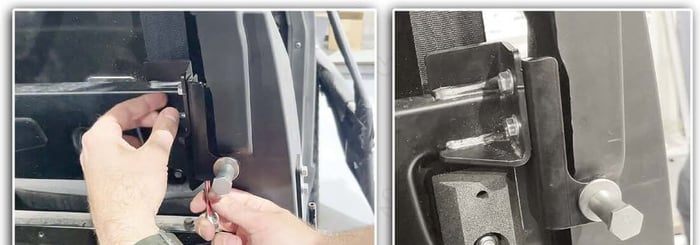
Rear striker behind the front seat.
6 Rear upper hinge bracket
Same idea as the front: backing plate into the welded bracket at the upper rear of the cage, weld nuts toward the vehicle, then the upper hinge bracket with the bend facing out. Two M8x20 flange bolts, loose.
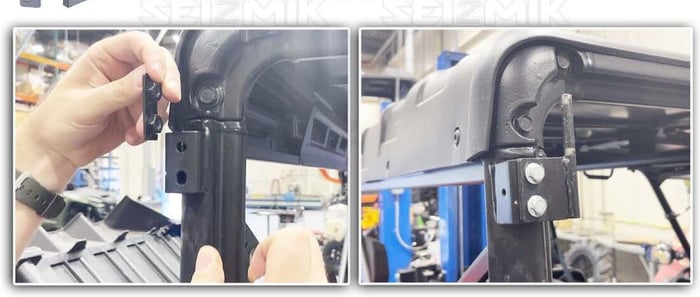
Rear upper hinge bracket on the cage.
7 Rear lower hinge bracket
Bed still up. Two threaded holes in the lower rear location, two M8x20 flange bolts, loose.
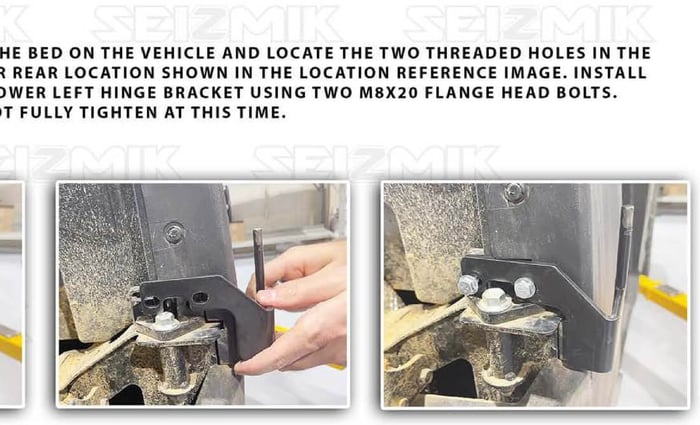
Rear lower hinge bracket.
Part 2 — Build The Doors
Four doors, same sequence each time. Do them on a bench or a clean floor.
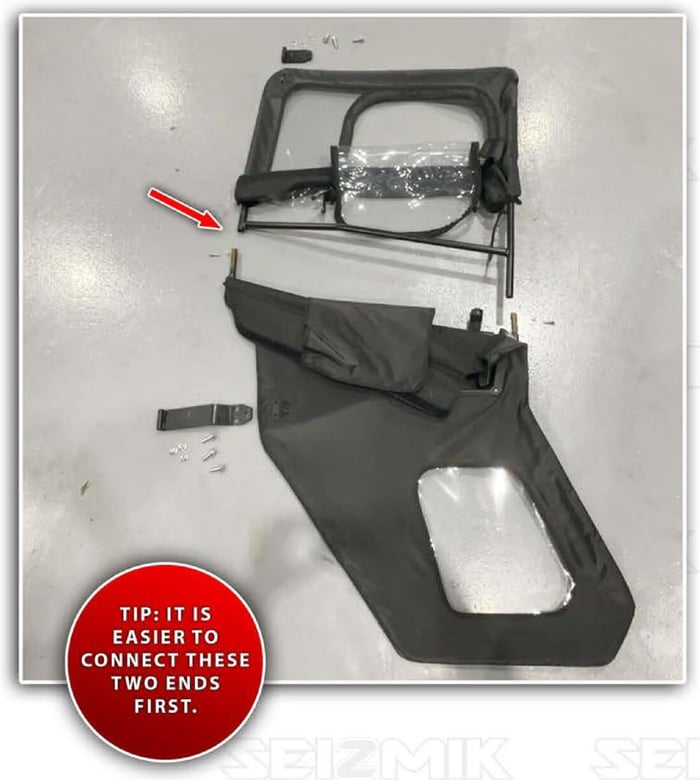
Lay it out this way. Connect the two ends the arrow points at first.
8 Strip the upper textile off
Loosen the velcro flaps and pull the textile off the upper door frame. You are going to put it back on at the end — it has to be off to join the frames.
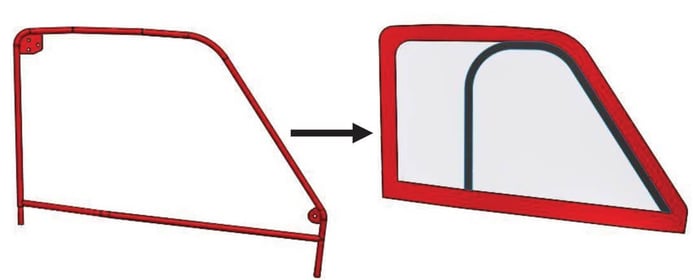
Upper textile comes off first.
9 Join the frame halves
Slide the top frame onto the bottom frame. You will have to flex the bottom frame slightly to line the tubes up — that is expected, not a fitment problem.
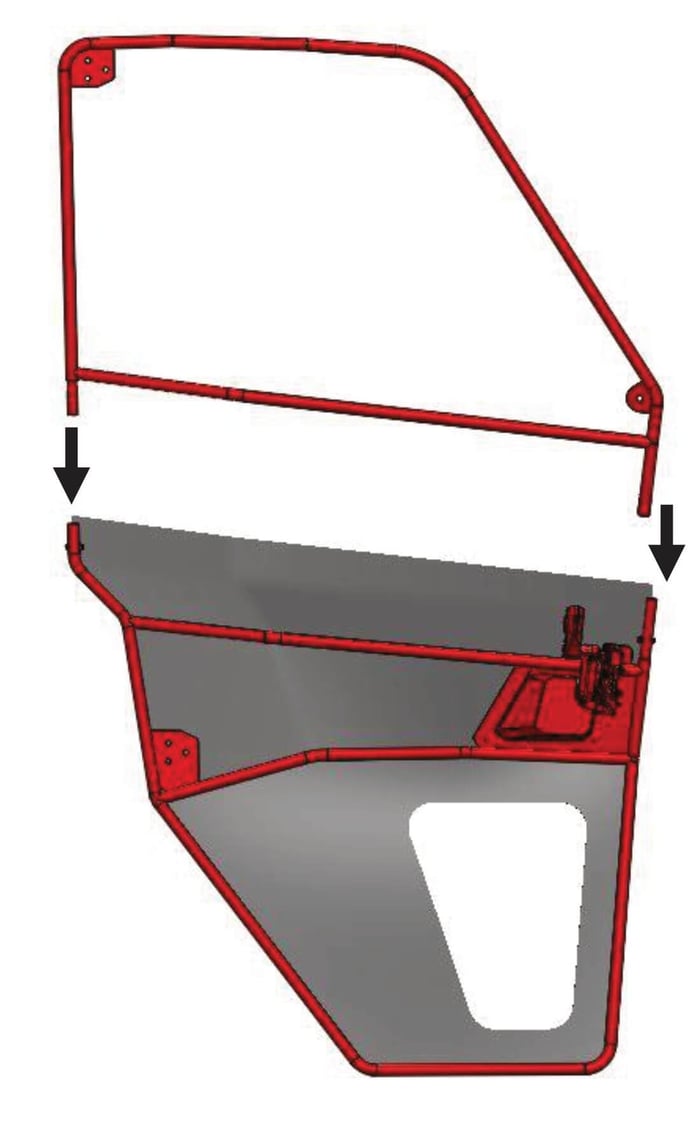
Top frame drops onto the bottom frame tubes.
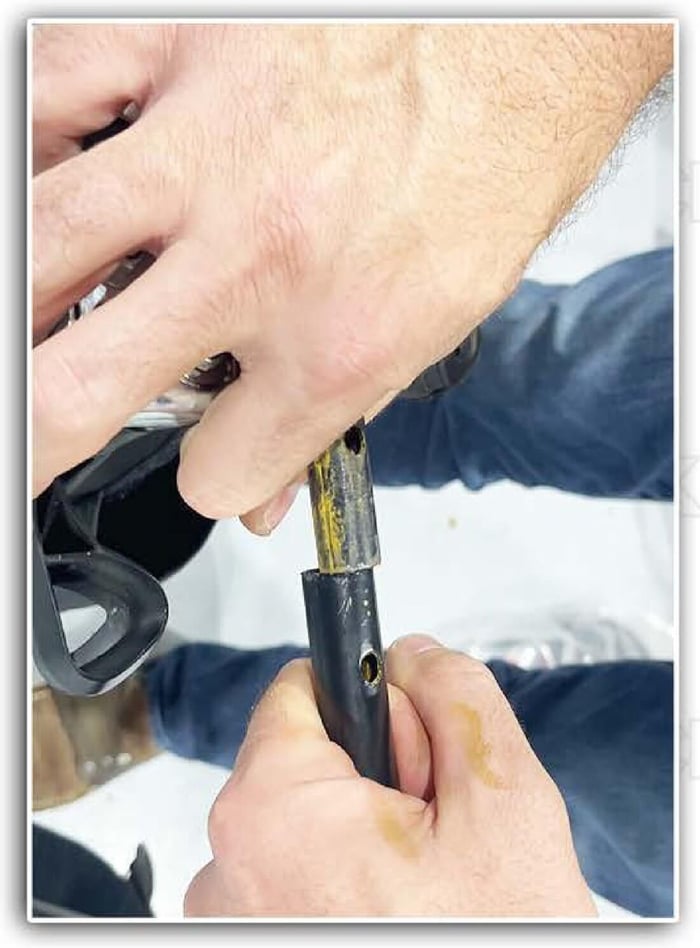
Flexing the lower frame to get the tubes to line up.
10 Bolt the frames — heads on the outside
Front and rear of the joint, M6x25 button head bolts and M6 lock nuts. The bolt heads must sit on the outside of the frame. Put them on the inside and the exposed threads will saw through the textile from behind, and you will not find out until the door is already leaking.
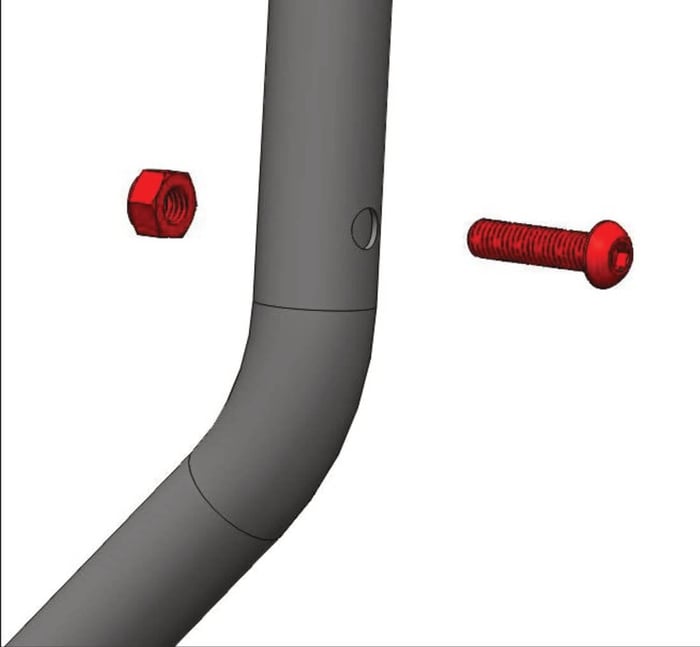
M6x25 button head through the joint.
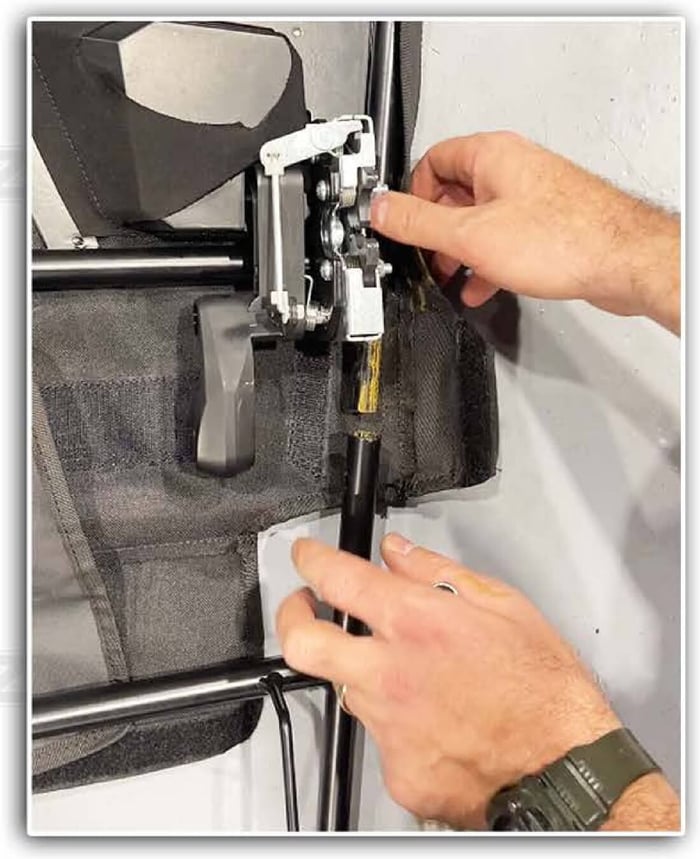
Both ends get bolted.
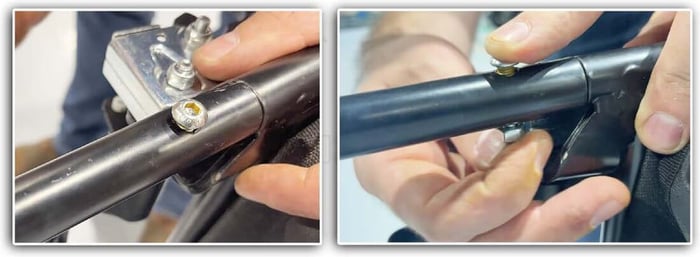
Heads out, threads and nuts inboard, away from the textile.
11 Wrap the lower textile over the top tube
Fold the top flap of the lower door textile over the top tube, pull it tight and fasten the velcro. Then keep going: loosen flaps, pull tighter, refasten. Work it until it is as taut and wrinkle-free as you can get it.
This is worth the time. Wrinkles left here are where wind noise and water come from later, and the hinge holes you cut in the next part are located off this textile.
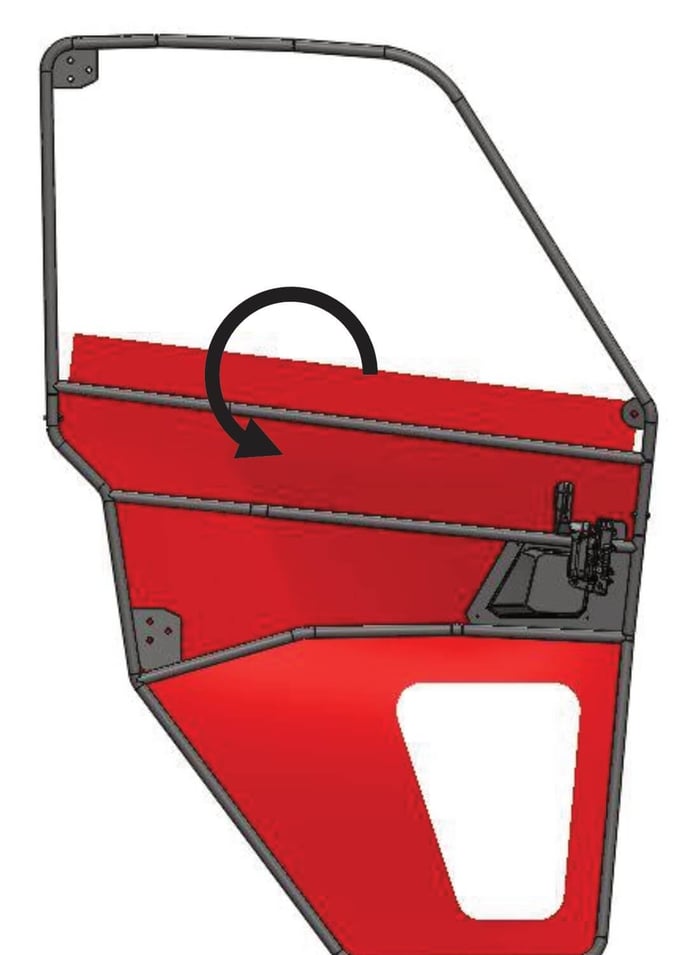
Flap folds over the top tube and velcros down.
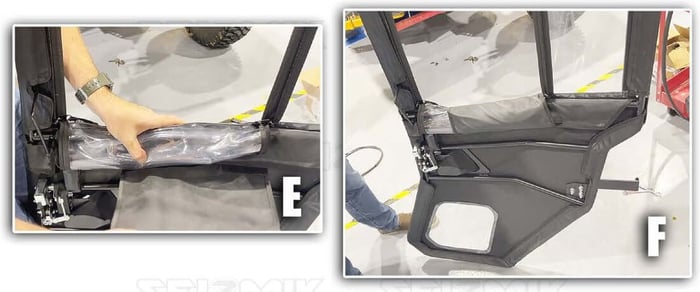
Keep re-adjusting until it is taut.
12 Reinstall the upper textile
Back on, same velcro routine, same standard — taut and wrinkle-free.
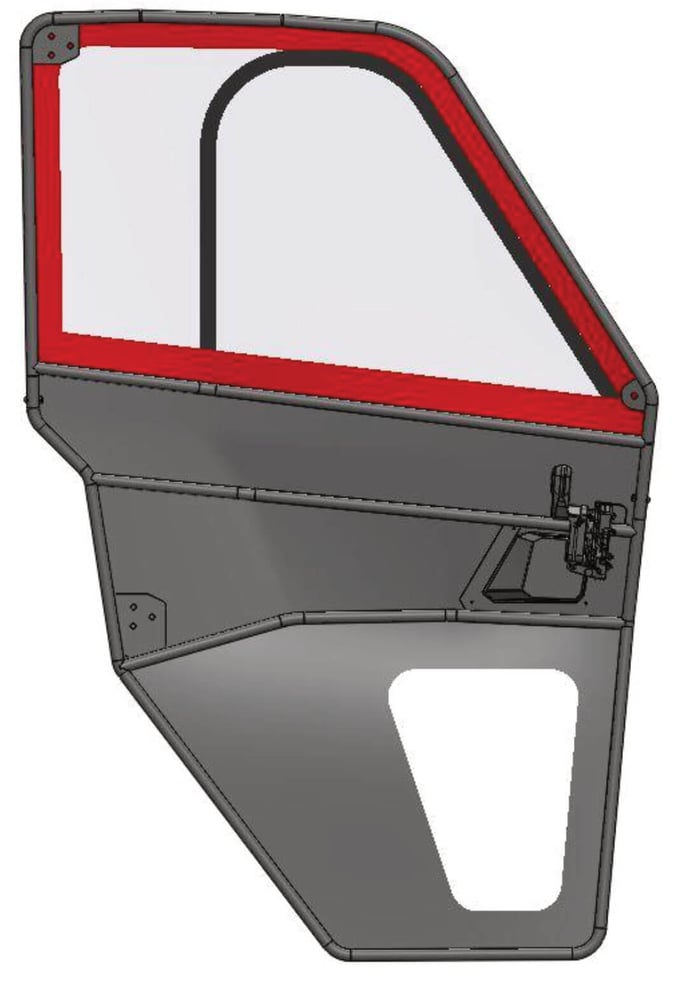
Door assembled, both textiles on.
Part 3 — Hinges Onto The Doors
The kit ships one of two gasket profiles. If yours is the larger of the two, do not install the door spacers — they are only for the smaller profile gasket. Get this backwards and the door will not close against the seal properly no matter how you adjust the striker.
13 Identify left from right
Viewed from the front, the left hinge angles one way and the right is the mirror of it. Check before you cut anything — the slits you are about to make in the textile are permanent.
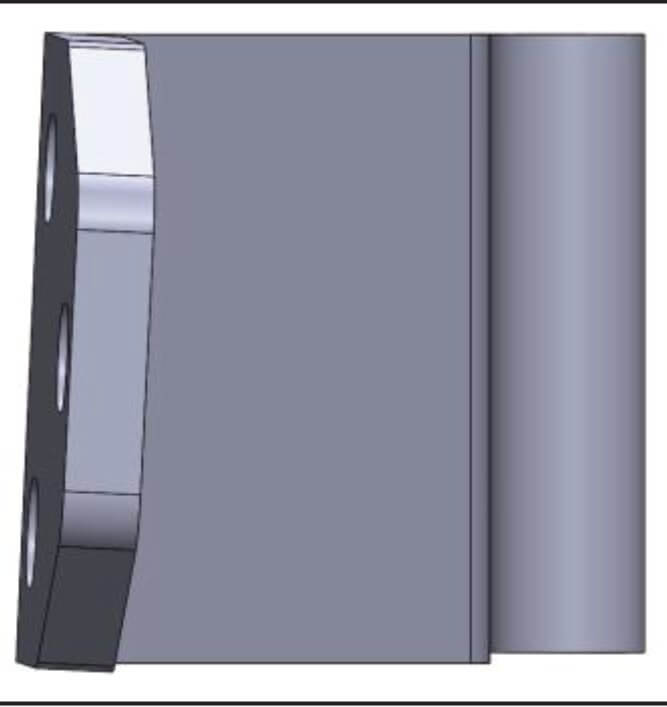
Left hinge angle. Right is opposite.
14 Slit the textile and bolt the hinges on
With the textile fit where you want it, find the hinge holes through the fabric. Make a slit at all six locations with a sharp knife — a slit, not a hole — so the bolts pass through. Bolt the hinges, and the spacers if your gasket calls for them, using M8x30 flange bolts and nuts. Leave them loose.
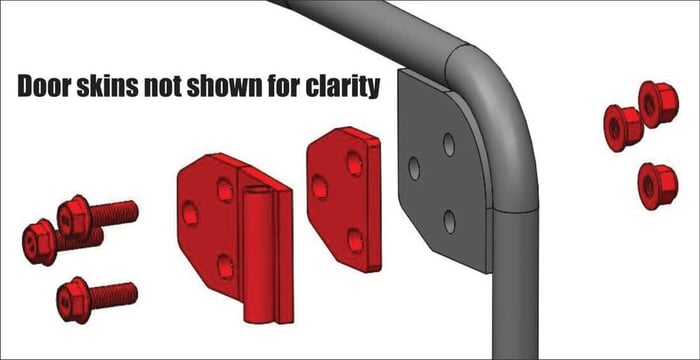
Upper hinge, shown with the skins hidden.
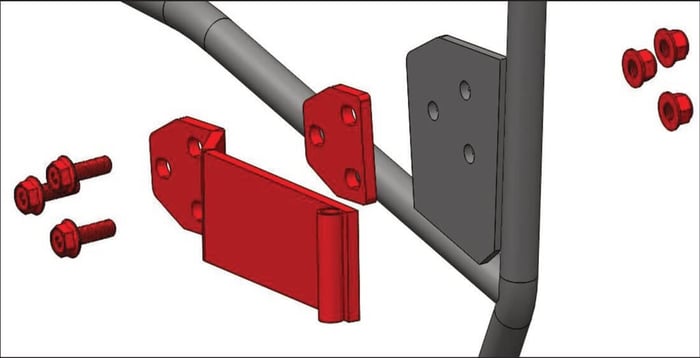
Lower hinge, same arrangement.
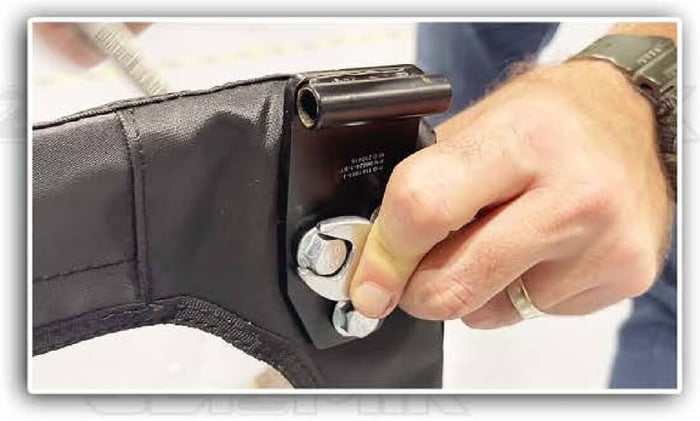
Bolt passing through the slit textile.
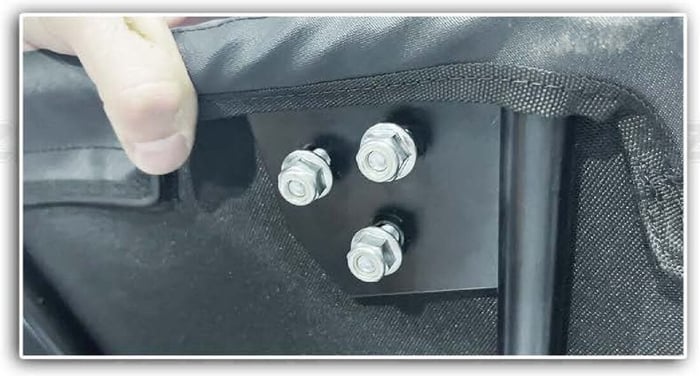
All three seated.
Part 4 — Weatherstrip
15 Clean the surface, then check the orientation
Wipe the mounting surface down with rubbing alcohol. Skip this and the tape lets go in a season. Then check the gasket is the right way round: the large part of the weatherstrip faces away from the door.
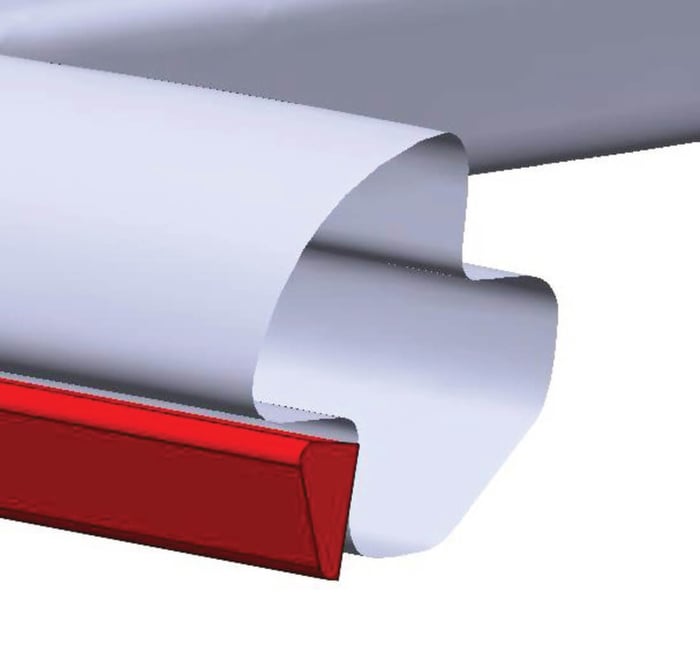
Large section faces away from the door.
16 Run it around the opening
Start a few inches below the striker bolt. Peel the backing a little at a time and press the gasket down gently every few inches — light pressure only, so you can still reposition it. Do not stretch it as you go; stretched gasket pulls back and opens gaps at the corners. Work all the way around to your starting point and trim the end.
Only once you are happy with the whole run do you go back and press the adhesive down hard along its full length.
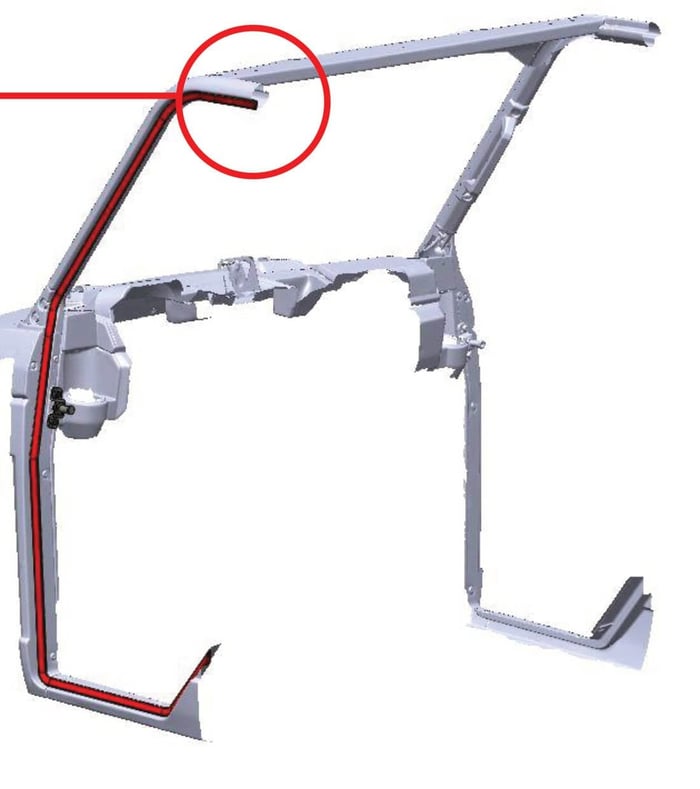
Start and finish here.
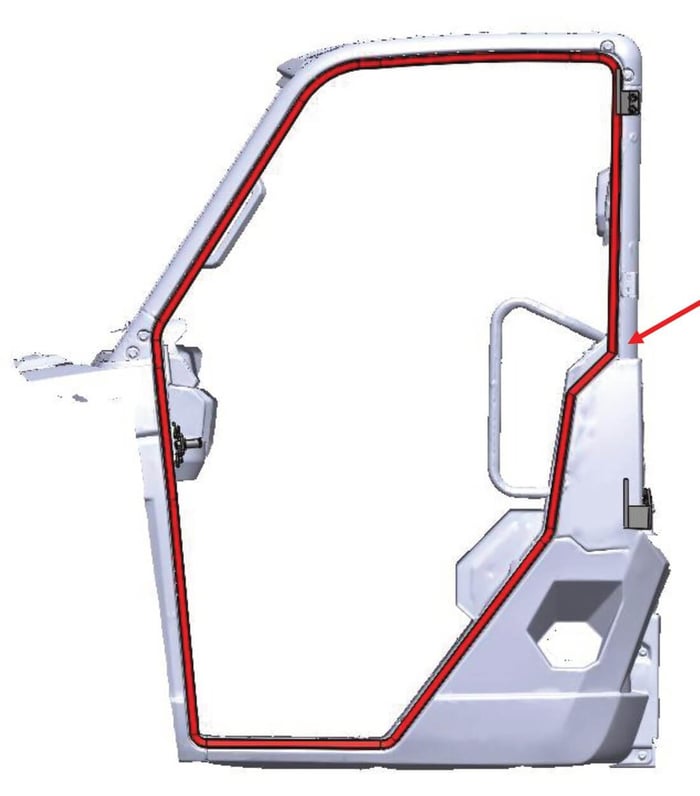
The full route around the opening.
Part 5 — Hang And Adjust
17 Mount the door
Slide the door onto the hinge mounts. Everything is still loose, so expect to wiggle it to get it all the way down onto the pins. Close and latch it gently.
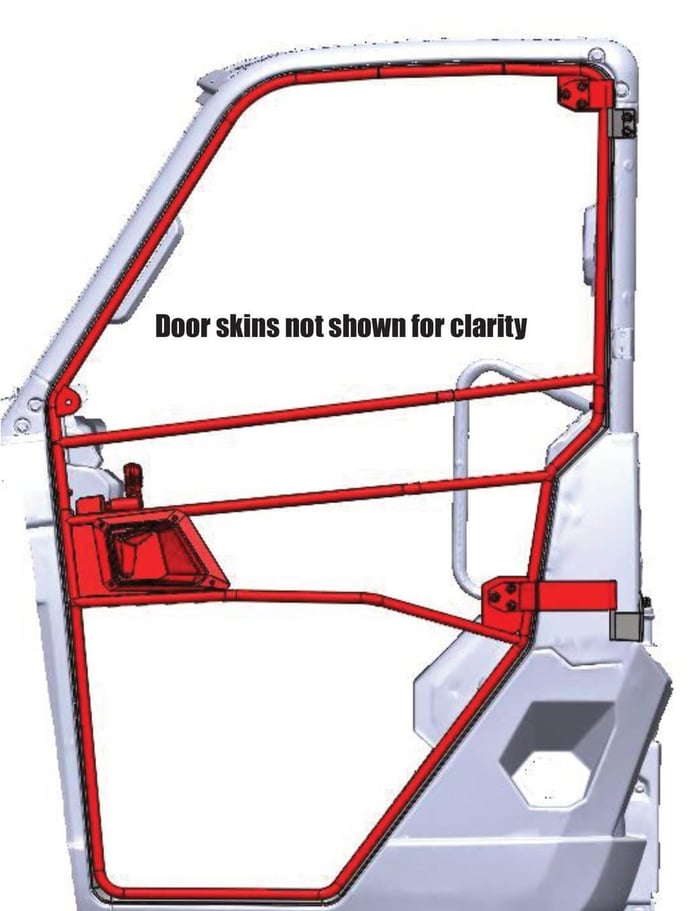
Door on the pins, skins hidden so you can see the frame.
18 Even the gap, then tighten the hinges
Move the door around until the gap is even the whole way around. Snug the striker bolt mount bolts, or get somebody to hold the door there. Do not worry yet about how tightly it closes — you are only setting position. Tighten all hinge bolts now.
19 Set how hard the door has to close
Pull the outside handle; the door should release and swing. Loosen the striker mount bolts and pull the mount as far out as it goes, then snug it back down.
The rotary latch has two positions. Close the door gently and push until you hear it click twice. Now loosen the striker mounting plate bolts and push the door until it fully compresses the gasket. Hold it there and tighten the striker plate bolts.
Open and shut it again. You want it closing without a slam, latching twice, fully shut. If it needs a slam, the striker is out too far.
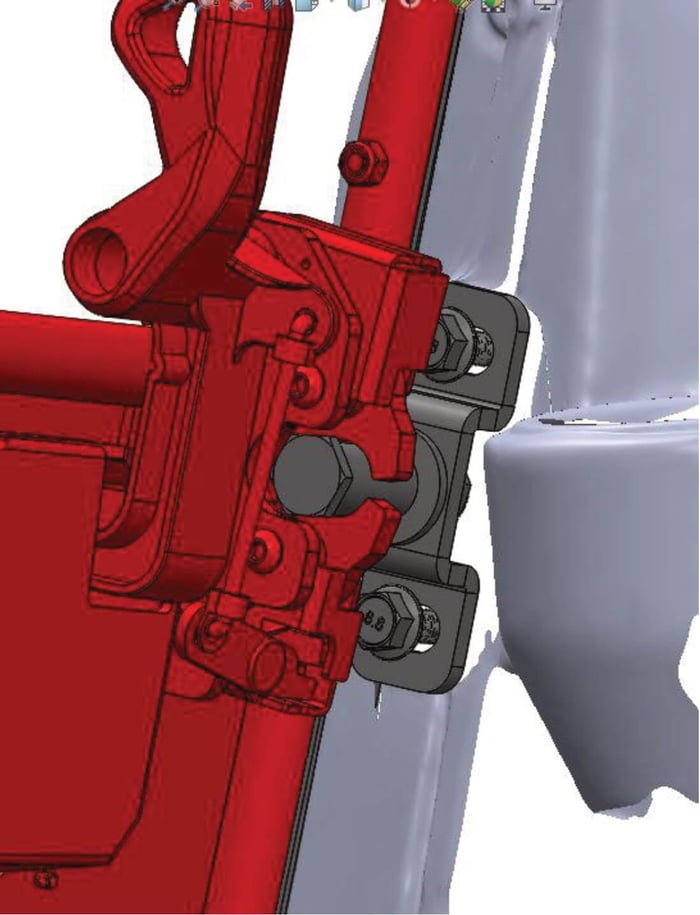
Rotary latch over the striker. Two clicks is closed.
20 Sit inside and look for light
Close the door, sit in the cab and look along the gasket for daylight. Production tolerances being what they are, the place it usually will not seal is the upper front corner.
The fix is more direct than people expect: the tubular frame bends by hand. Stand between the cab and the open door, hold the latch area, and pull the upper front corner slightly toward you. Recheck and repeat until the light is gone.
21 Gap along the top? Use the 18-inch gasket
If a gap shows along the upper tube once the door is down on the bottom hinge, that is what the extra 18-inch length of gasket is for. Run it on the inside of the door frame facing the gap, under the textile, and it fills it.
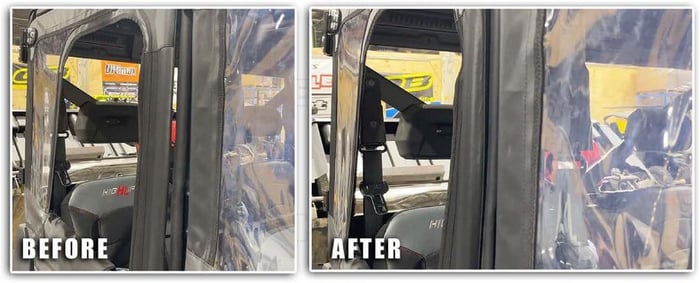
Before and after the extra gasket.
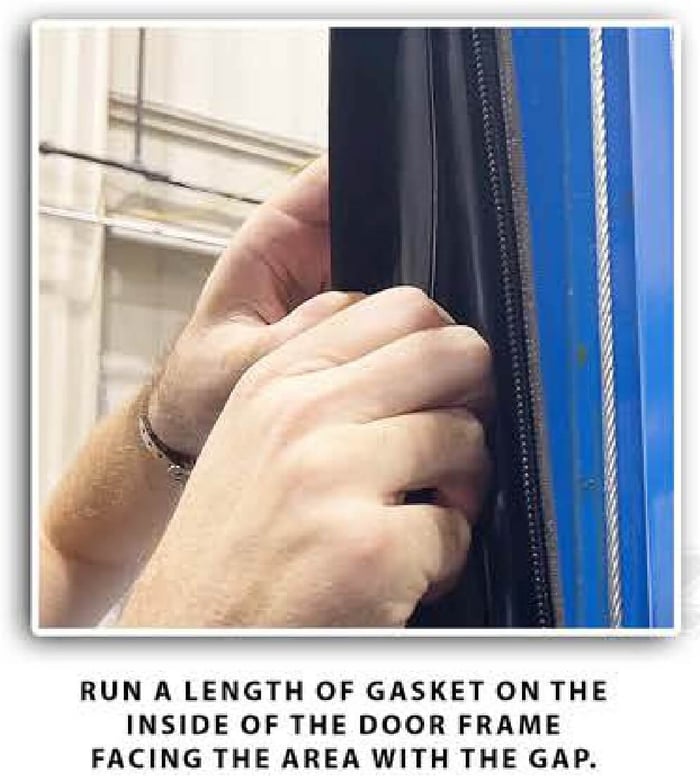
Gasket run inside the frame, facing the gap.
22 Go back and tighten everything
Once the door fits the way you want it, every bolt gets tightened. Then repeat the whole thing on the remaining three doors.
Adding Mirrors
The door frames have mirror brackets built in, and they take Seizmik mirrors — P/N 18088, 18073, 18083 or 18093.
Find the bracket on the inside of the door frame and mark the hole with a punch so it shows through on the outside of the textile. Cut the textile with a razor just enough for the mounting bolt to pass. Pass the bolt through the bracket, thread it into the mirror and tighten — do not over-tighten, you are clamping fabric against a bracket.
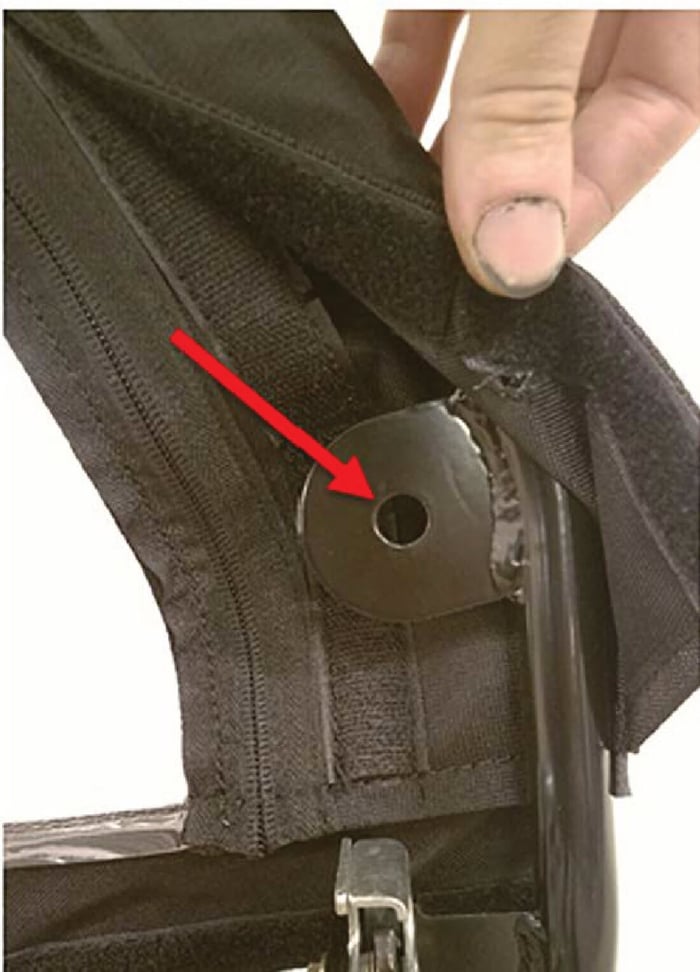
Bracket on the inside of the frame — mark it with a punch.
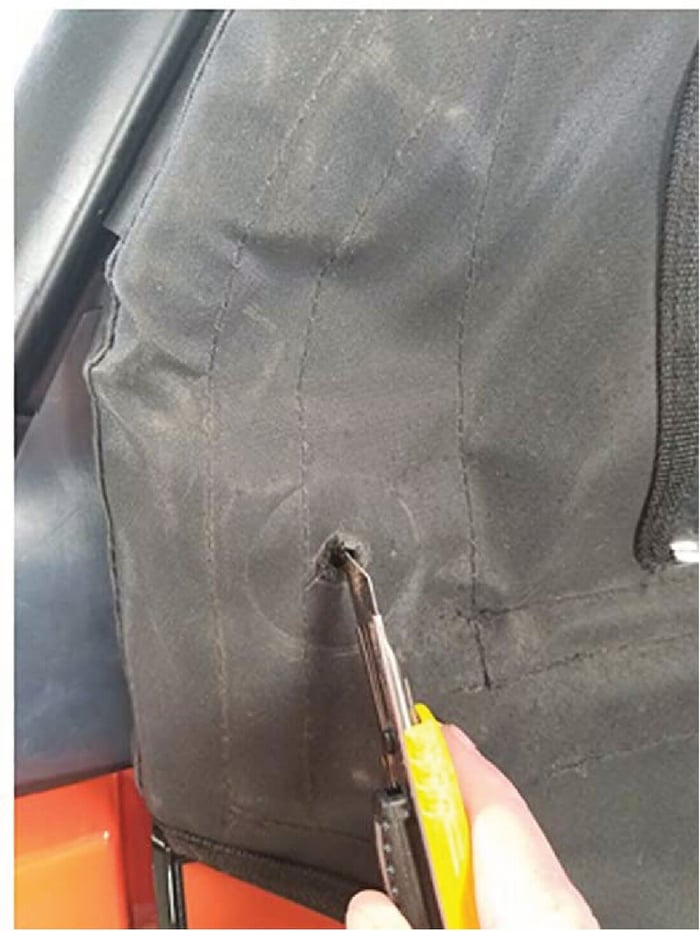
Just enough for the bolt.
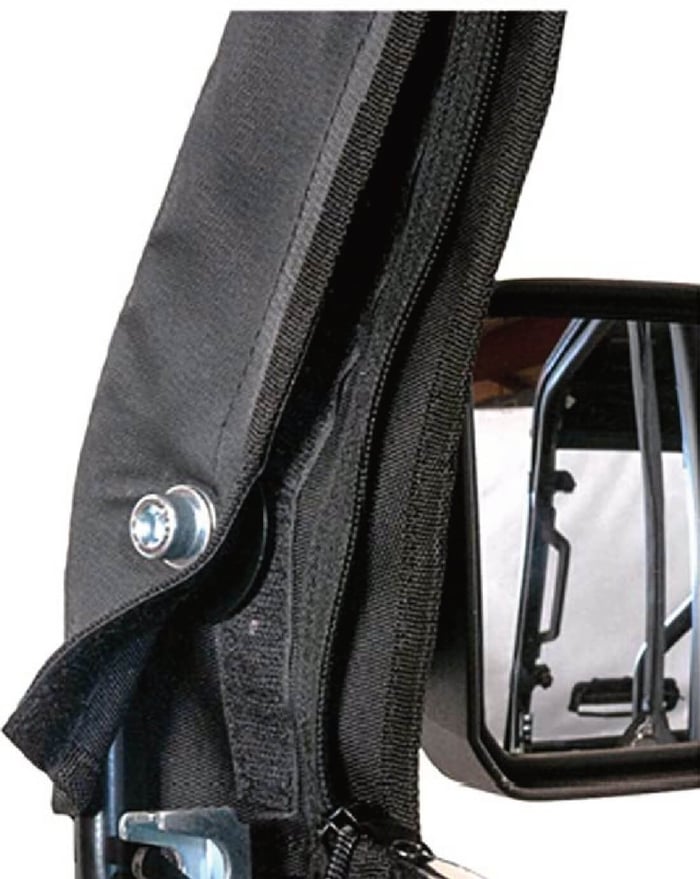
Bolt through, mirror threaded on.
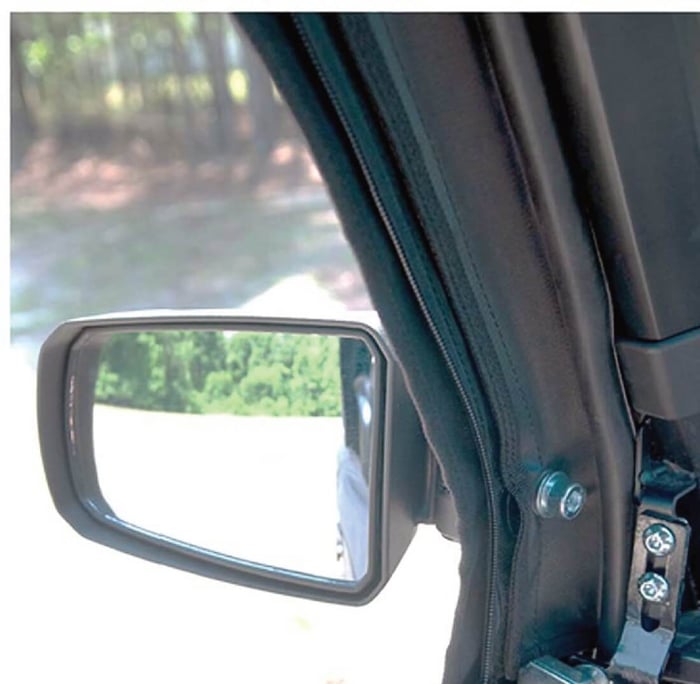
Mounted.
Replacement Parts
Worth knowing before you cut anything: almost every piece of this kit is available on its own. Tear a skin on a limb and you replace the skin, not the door.
- Upper textile — 54-SW-90742 driver, 54-SW-90743 passenger
- Lower textile — 54-SW-90744 driver, 54-SW-90745 passenger
- Upper door frame — 54-SW-90758 driver, 54-SW-90759 passenger
- Lower door frame — 54-SW-90760 driver, 54-SW-90761 passenger
- Rotary latch — 54-SW-90762 driver, 54-SW-90763 passenger
- Door handle — 54-SW-90954 driver, 54-SW-90955 passenger
- Door pocket — 54-sw-90947 driver, 54-sw-90948 passenger
- Lock rod 54-90122R, lock rod clip 54-R4-0-43922-1
- Striker bolt 54-SW-90747, striker bracket 54-SW-90746
- Upper hinge plate 54-SW-90748, upper backing plate 54-SW-90284
- Lower hinge plate — 54-SW-90751 driver, 54-SW-90752 passenger
- Door spacer 54-SW-90755
- Self-adhesive bulb gasket, 168 inch — 54-SW-90294
- Hardware kit without gaskets — 54-SW-19209
Call us with the part number and we will get it ordered.
Troubleshooting & FAQ
I have a 2018 Ranger Crew. Why won't these fit when they fit a 2018 XP 1000?
Because those are two different bodies wearing the same model year. Polaris redesigned the 3-seat XP 1000 for 2018 but carried the Crew over on the old body until 2019, when it went an inch and a half wider with new panels. The door jamb is a different shape. A 2018 Crew needs the older-body door kit — call us and we will sort out which one.
Which box do the front door brackets come out of?
The rear one. Items 19 through 22 in the 52-06025 box are the front door brackets for a Crew. Items 6, 7, 13 and 14 in the 52-06024 front box are for a two-seat machine and are not used on a four-door. If your front hinge brackets seem to sit wrong, this is almost certainly why.
There's daylight at the top front corner of my door and the striker adjustment won't fix it.
That corner is the usual one, and the striker is the wrong tool for it. The tubular door frame bends by hand. Stand between the cab and the open door, hold the latch area, and pull the upper front corner toward you a little. Check for light again and repeat. It takes less force than you would think.
Do I install the door spacers or not?
Depends which gasket came in your kit. Two profiles ship. If yours is the larger one, leave the spacers out. They exist only to make up the difference when you have the smaller profile gasket.
My door has to be slammed to latch.
The striker is sitting too far out. Loosen the striker mounting plate bolts, push the door in until it fully compresses the gasket, hold it there and retighten. You are aiming for two clicks with a normal push, not a slam.
I cut the textile in the wrong place for a hinge bolt.
A slit in the right general area will still be covered by the hinge plate. If it is badly off, the textiles are sold separately by side — see the replacement parts list above. This is why step 11 pushes so hard on getting the textile taut first: the hinge holes are located off the textile once it is fitted, not measured.
Can I run these with my factory roof?
Yes. They are designed around OEM Polaris hard tops and most windshields. Mixing with another brand's roof or windshield is the case where fit gets unpredictable — tell us what you are running and we will check before you order.
How long does this really take?
Give it half a day for all four. The brackets go quickly; the time goes into working the textiles taut and then dialing in four separate door-to-gasket adjustments.
Direct Resource Links
→ Kit Info & Fitment — Trailworx UTV Ranger Crew Framed Door Kit 52-06026
→ Every Ranger Door We Carry — Trailworx UTV Polaris Ranger Doors
→ More for the Crew — Trailworx UTV Polaris Ranger Parts Catalog
Get the Ranger Crew Framed Door Kit — Part 52-06026 →
Not sure this is the right kit for your Crew? Call 430-258-6189 or email sales@trailworxutv.com with your year and model and we'll confirm the fit before you order — especially if you're on a 2018.