
Polaris Ranger XP 1000 Spike Door Kit Installation Guide (58-9800)

Table of Contents
✓ 2020–2027 Ranger 1000
✓ 2021–2027 Bobcat UV34 standard cab
✓ 2019–2023 Ranger PRO XD
✓ 2023–2024 Ranger XP Kinetic
✗ Any Ranger Crew — the hinges sit in a different place
✗ Ranger XD 1500
✗ 2017 Ranger XP 1000 — that machine takes Spike 58-9200
Shop the Ranger XP 1000 Door Kit — Part 58-9800 →
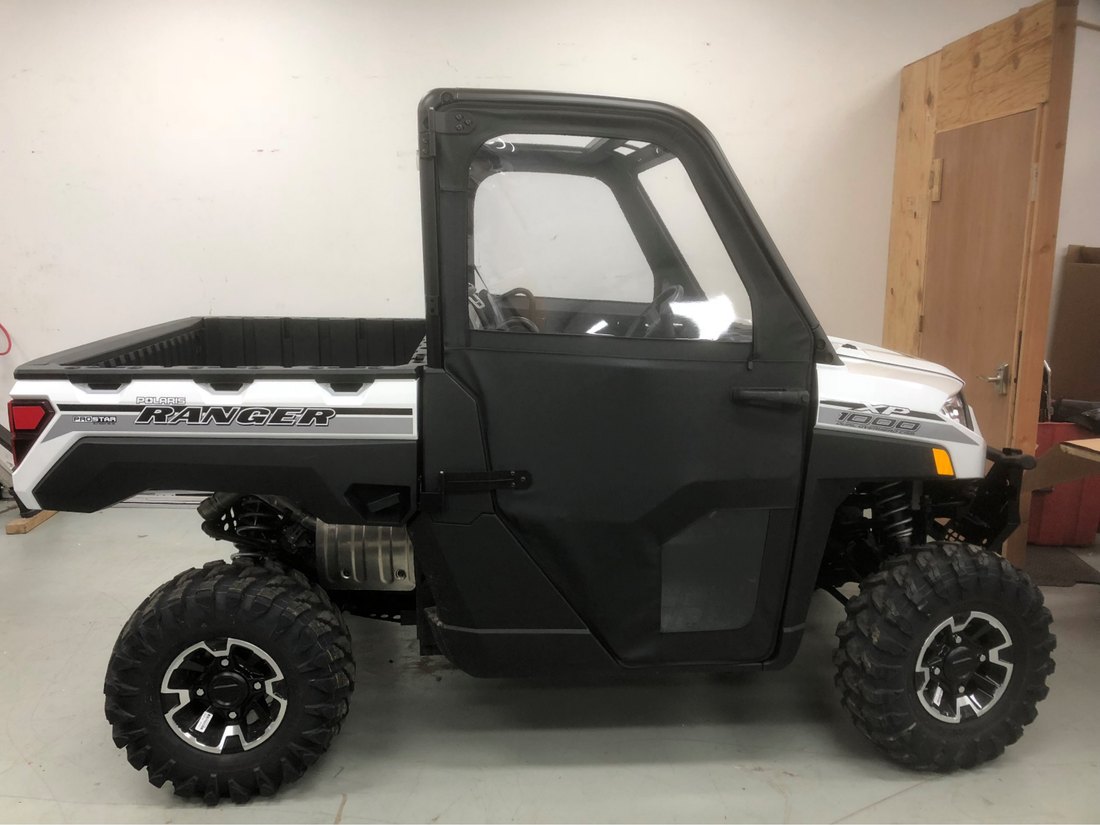
Spike 58-9800 installed — Polaris Ranger XP 1000.
This is not a bolt-on. Half of this job is taking your factory side nets off the cage, and a good part of the rest is burning holes through the door fabric in exactly the right spots. Read the whole thing before you open the box — there are two or three places where doing a step in the wrong order costs you a door skin.
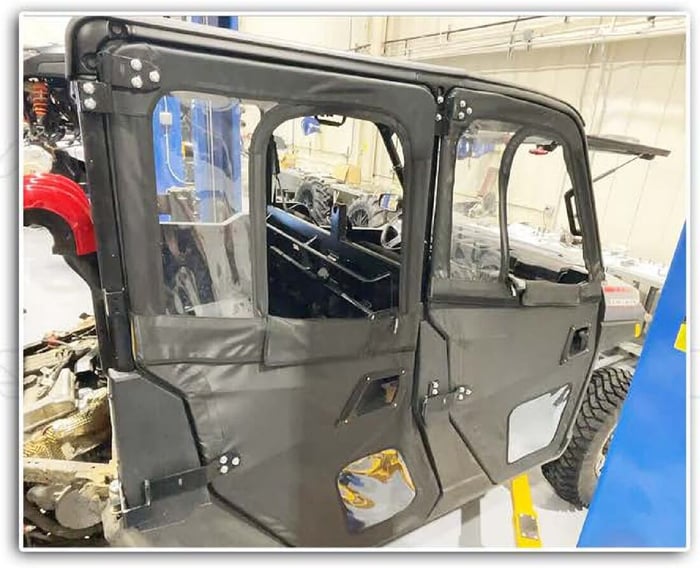
The other thing to know up front: you are building two complete doors, not bolting on upper and lower halves. Each door is one fabric skin stretched over a two-piece aluminum frame that you assemble yourself in step 1.
Before You Start
Nothing gets fully tightened until the door is hanging and latching. The striker, the rotary latch and the upper vehicle hinge are all slotted so they can move — that movement is what lets the door seal against the frame. Snug them enough to hold position and no more. The only thing that gets torqued early is the lower vehicle hinge.
These doors replace your factory side nets. If you have a NorthStar or CAB model that came with factory doors and powered windows, this kit is not for your machine. If you have a Crew, the hinge locations are different and Spike does not build a Crew door at all. Not sure which you have? Call or text us before you order.
The kit uses two adhesives — grip adhesive and Vibratite. Both need room temperature to set, and the machine needs to sit 24 hours before you ride it. Plan the job for an evening rather than an hour before you leave.
Required Tools
- Safety glasses
- 10mm and 13mm wrenches
- 10mm socket and ratchet
- T40 Torx driver
- Phillips screwdriver
- Awl
- Heat gun — for the shrink tubing
- Soldering iron — for burning holes in the fabric
- Hand drill with 1/4" and 5/16" bits — a substitute for the soldering iron, see step 6
- Razor knife
- Two zip ties, roughly 12"
- A scrap of thin wood, about 6" square
Hardware Checklist
Lay everything out and count it before you start. Spike ships a lot of small parts and the two latches are handed — they are not interchangeable.
- Lower door frame, left and right
- Upper door frame, left and right
- Fabric door covering, left and right
- Rotary latch, left (P45-1075) and right (P45-1076) — handed, do not mix these up
- Upper door hinges (P45-1365) ×2, lower door hinges (P45-1366) ×2
- Upper vehicle hinges, left (P45-1367) and right (P45-1368)
- Lower vehicle hinges, left (P45-1369) and right (P45-1370)
- Door strikers (P45-1371) ×2
- Outside door handles (P46-1127) ×2, inside knobs (P46-1044) ×2
- Door limiter straps ×2, heat shrink tubing ×2
- 8mm x 20 Torx head screws (P47-1244) ×24
- 8mm flat washers (P47-1293) ×28, 8mm lock nuts (P47-1353) ×12
- 6mm flanged bolts (P47-1289) ×6, 6mm flanged bolt with hole (P47-1316) ×2
- 6mm eye end with cable (P47-1315) ×2, 6mm fender washers (P47-1292) ×2, 6mm lock nuts (P47-1359) ×2
- Plastic washers (P47-1335) ×4, self-tapping screws (P47-1386) ×2
- Foam grips (P49-1026) ×2, grip adhesive (P49-1027), Vibratite (P49-1013)
The instructions and photos below show the left side. Everything gets repeated on the right.
Installation Steps
Part 1 — Build the doors on the bench
1 Join the frame halves
Match the left parts to the left and the right to the right — they are mirrored, not identical. Slide the upper section into the lower section until the ends bottom out against each other.
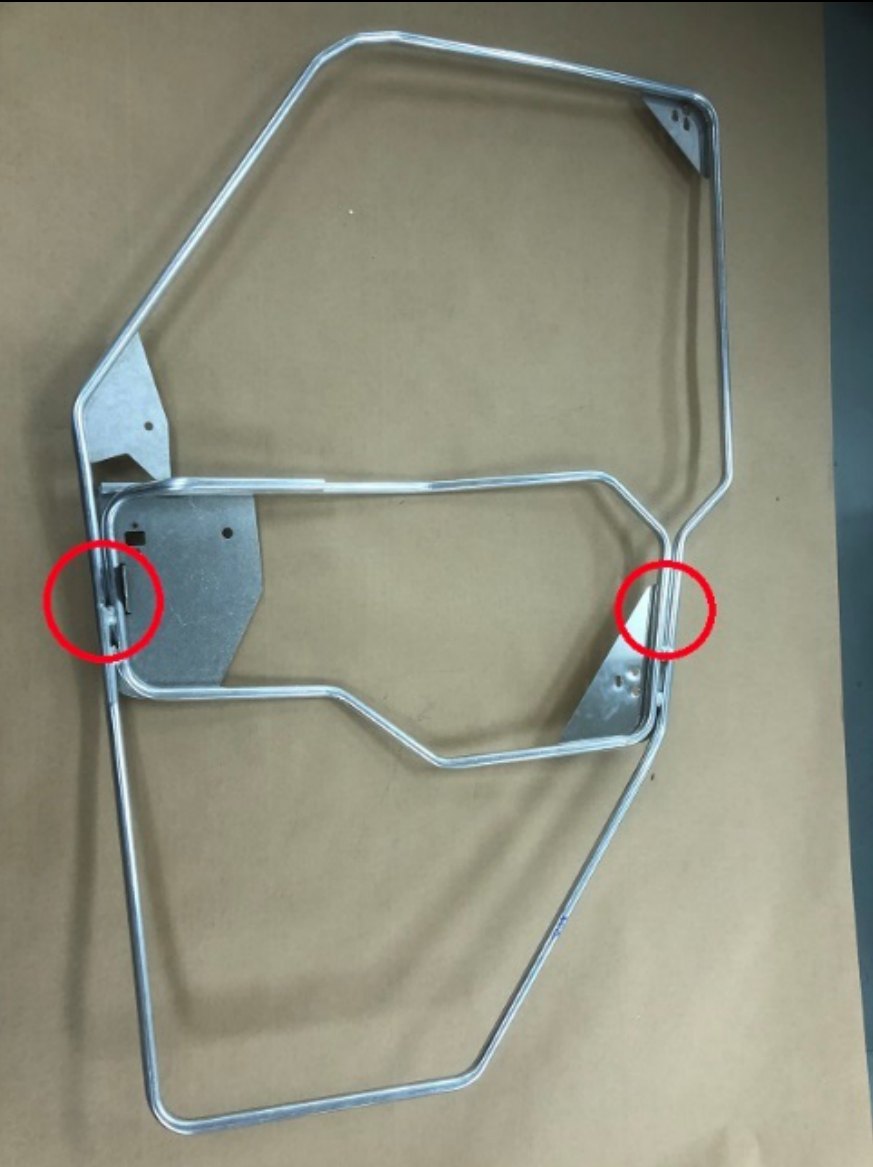
The two circled joints are where the frame halves meet.
2 Lock the frame with the self-tapping screw
Drive the self-tapping screw through the mirror mount plate into the lower frame tube. This is the only thing holding the two frame halves together, so get it tight.
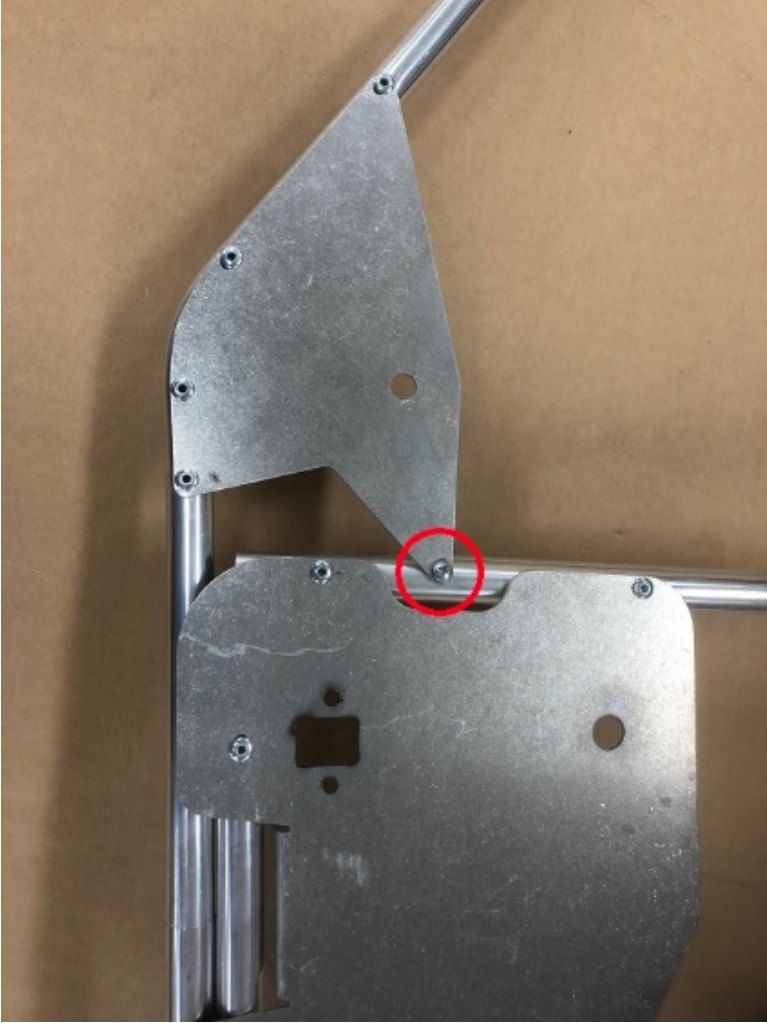
Self-tapping screw through the mirror mount plate.
3 Start the fabric skin on the lower frame
Lay the skin inside-up on a clean flat surface. Unzip both the inner zipper and the window zipper. The two sides of the skin are held together with hook-and-loop around the lower clear window — pull that apart by hand or the frame will not seat. Work the skin onto the lower portion of the frame.
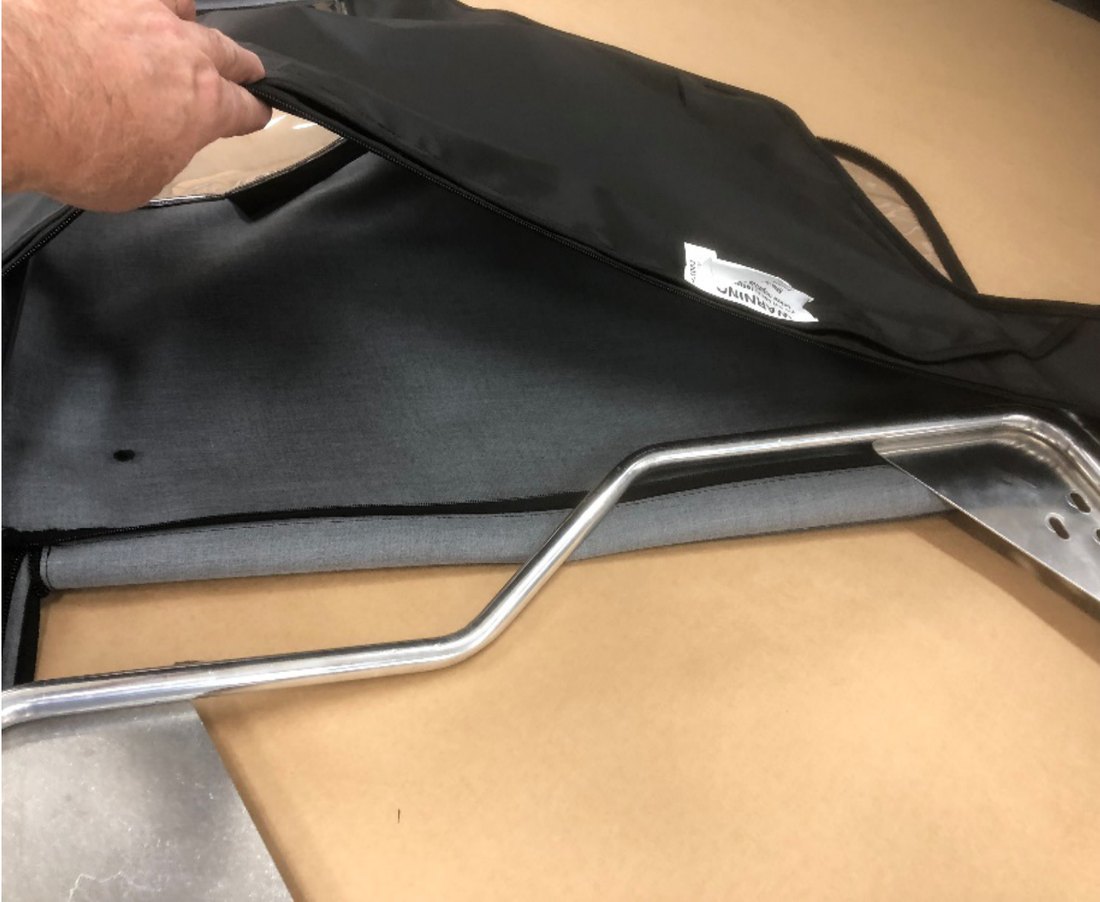
Skin going onto the lower frame first.
4 Work the skin over the top
Stretch the skin around the upper rear corner and keep working it over the frame. The upper front corner is the last thing to go on — try to do it earlier and you will fight it.
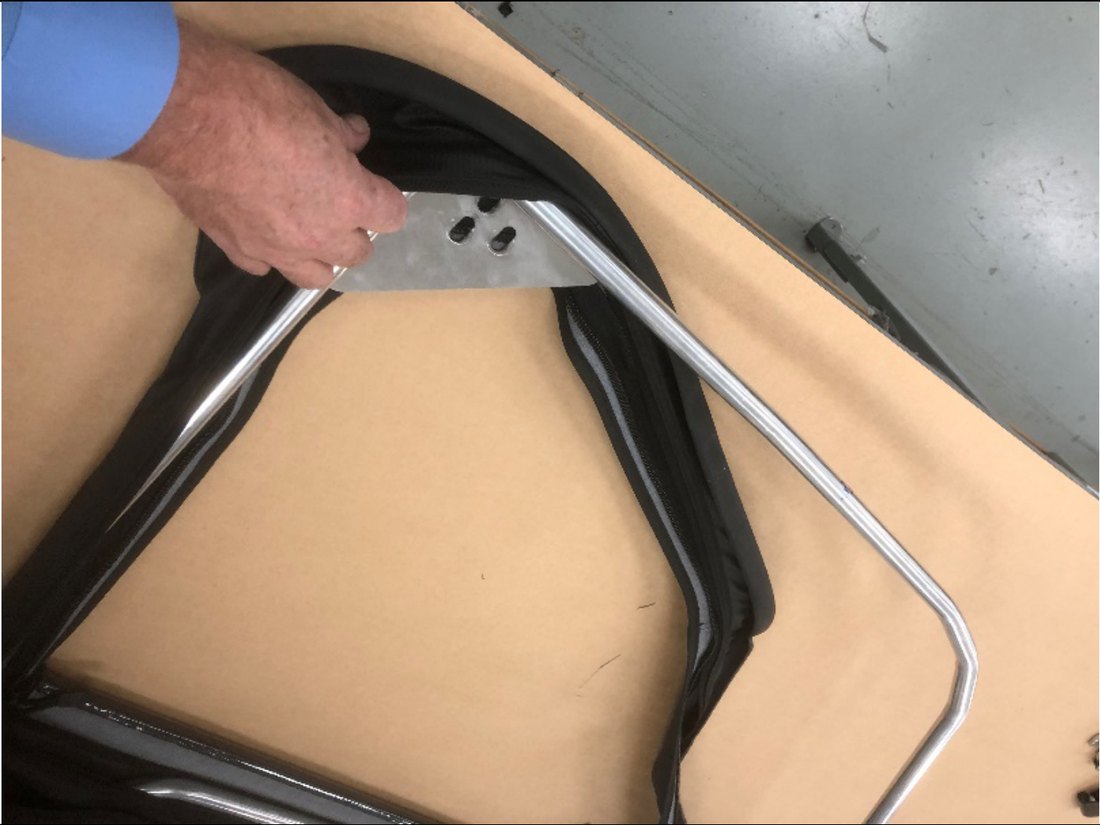
Upper rear corner goes on before the front.
5 Check the fit before you burn anything
Zip the skin partway closed, stopping just short of the door handle plate. Look it over: no wrinkles, and the skin sitting roughly centered on the frame. Fix it now. Once you start burning holes, the skin's position is permanent.
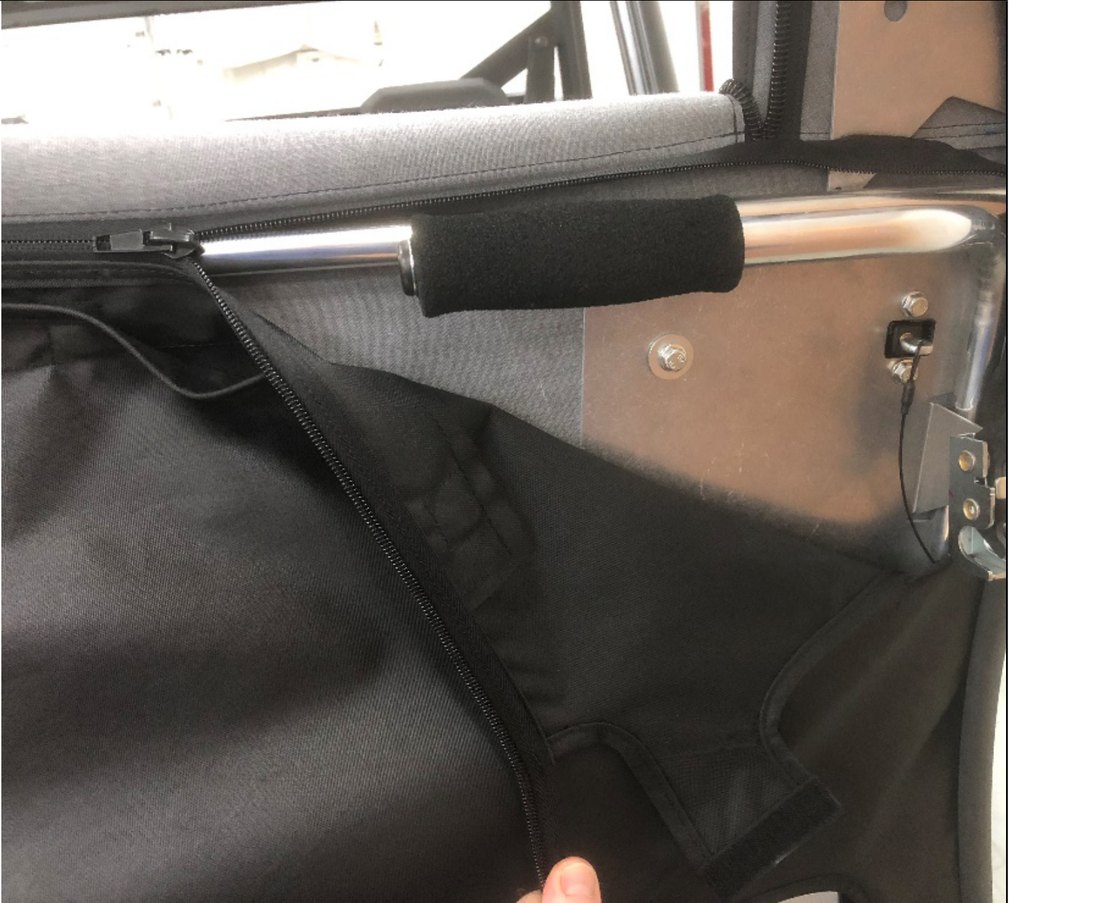
Wrinkle-free and centered before any holes are made.
6 Burn the handle holes
Working from the inside of the door, use the soldering iron to burn through the skin for the three door handle bolts and the four corners of the rectangular cutout. Finish the rectangle with the razor knife, then run the iron around the cut edges to seal them so they cannot fray.
Go slowly here — the inner door fabric is directly behind what you are burning and it is easy to take out both layers at once.
No soldering iron? A drill works, but run it in reverse so the bit pushes the weave aside instead of grabbing it, and seal the cut edges afterward with a lighter.
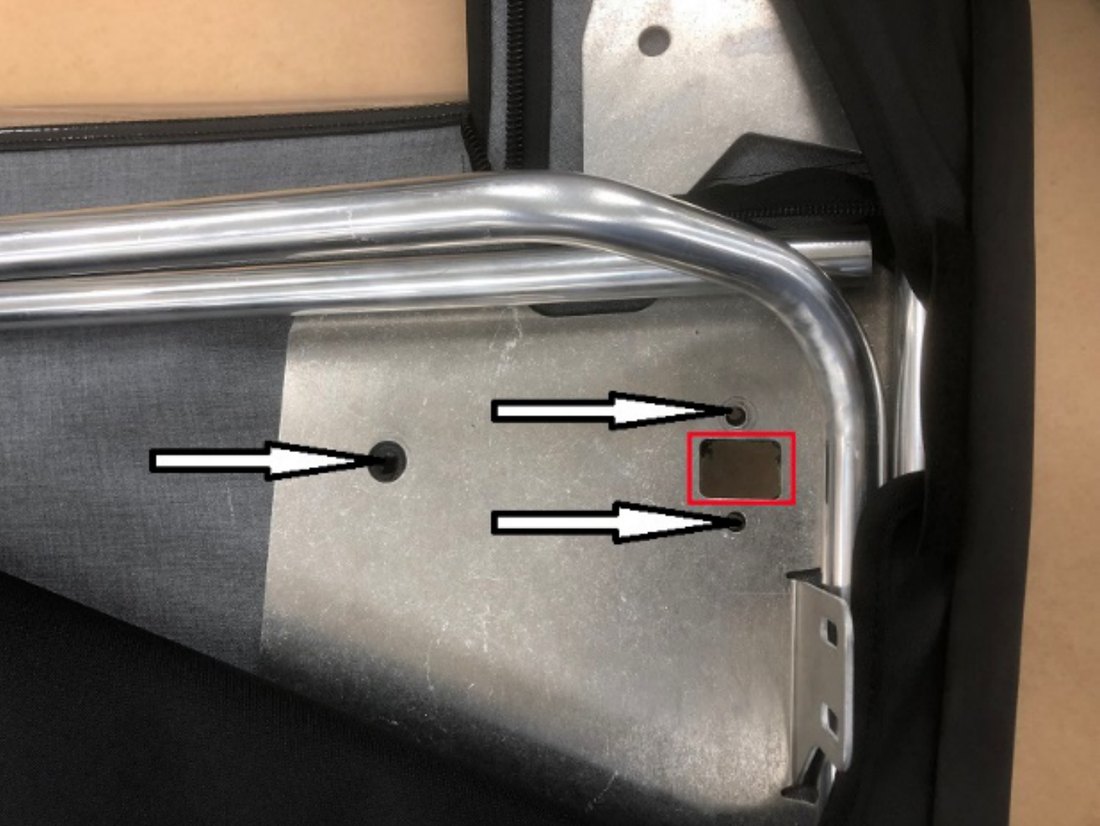
Three bolt holes (arrows) and the rectangular cutout (boxed).
7 Mount the outside handle
Three 6mm bolts hold the handle on, and only the rear one gets a fender washer. Make sure the handle sits flat to the plate and the plastic boss on its back drops into the rear hole. Then thread the 6mm eye end with cable all the way into the handle.
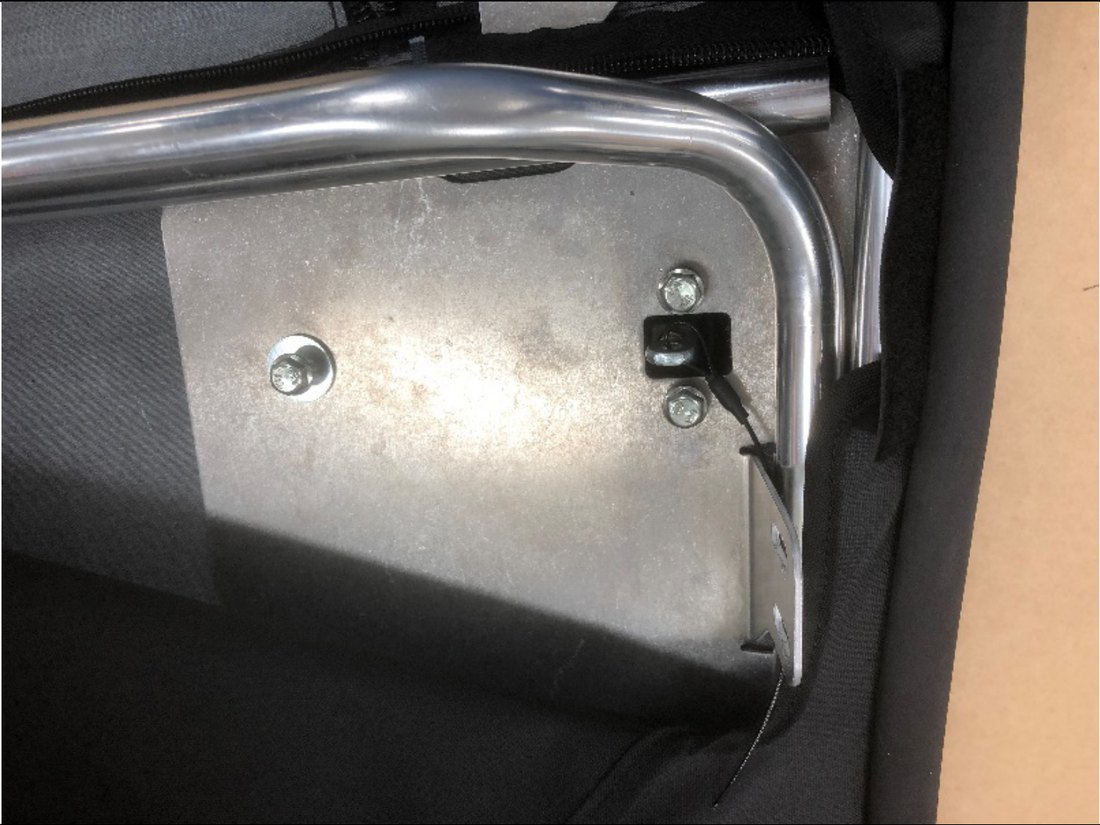
Handle mounted flush, boss seated in the rear hole.
8 Hang the rotary latch loose
Two 6mm bolts, snugged but not tight — this latch has to move later. Check you have the correct handed latch for this door: the face with writing on it goes against the plate, and the face with the extended grommets faces away.
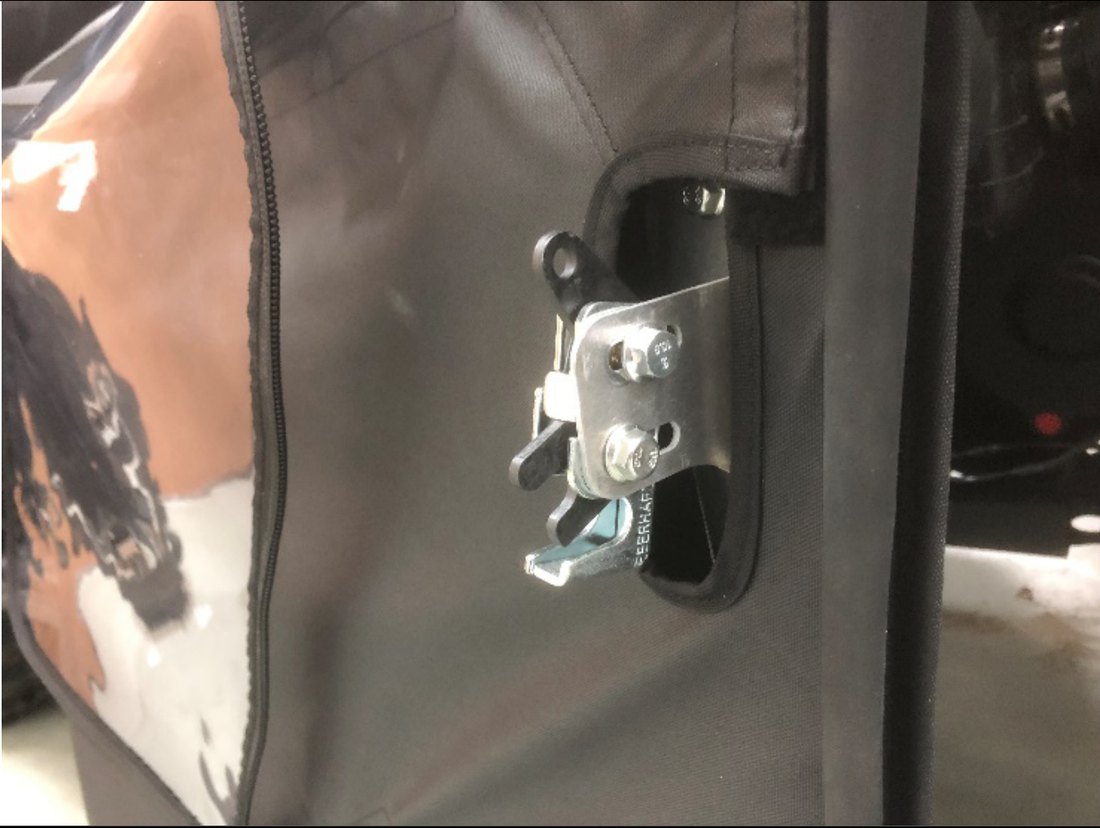
Latch snug, not tight — it moves again in step 18.
Part 2 — Strip the nets off the machine
Everything you take off in this section should be kept. If you ever pull the doors, you will need the nets and the original hardware to put the machine back to legal.
9 Remove the net front buckle bracket
Two T40 Torx screws. Keep the screws — the door striker uses them in the next step.
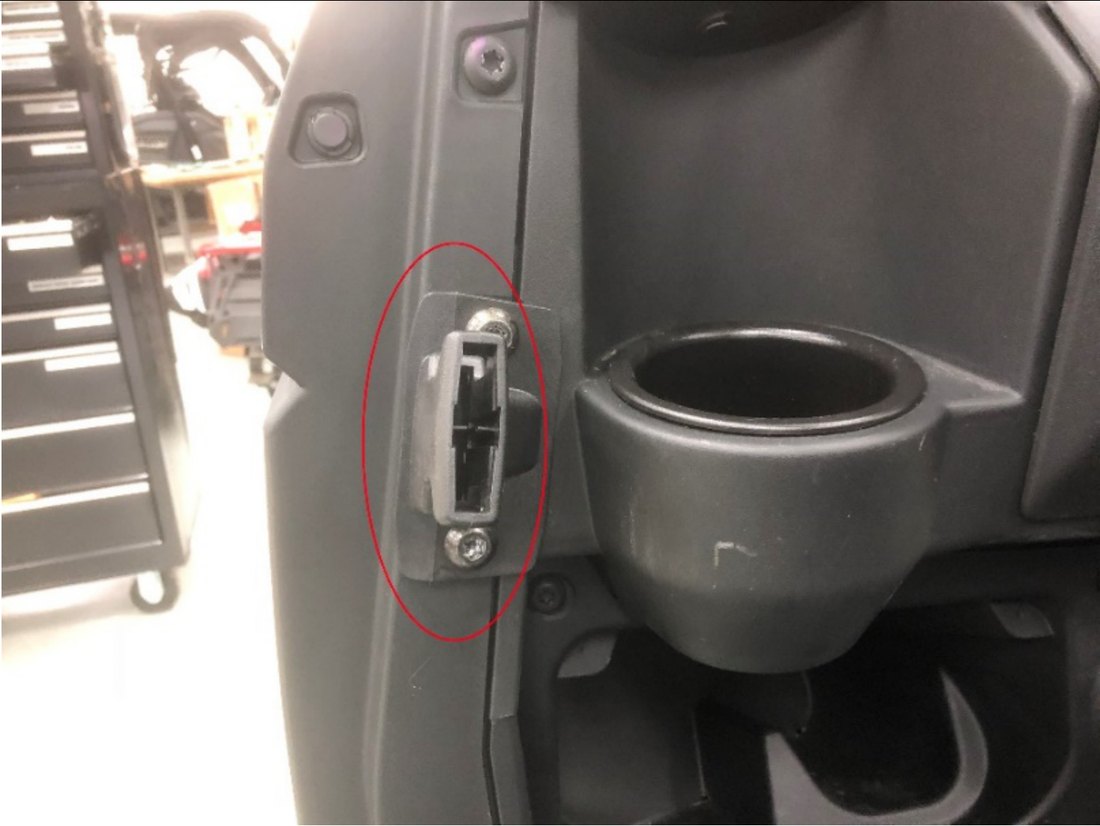
Net front buckle bracket — two T40 screws.
10 Fit the door striker in its place
Use the two T40 screws you just removed. Center the striker and leave the screws loose enough that it can still slide up and down — this is the part you will be moving to make the door seal.
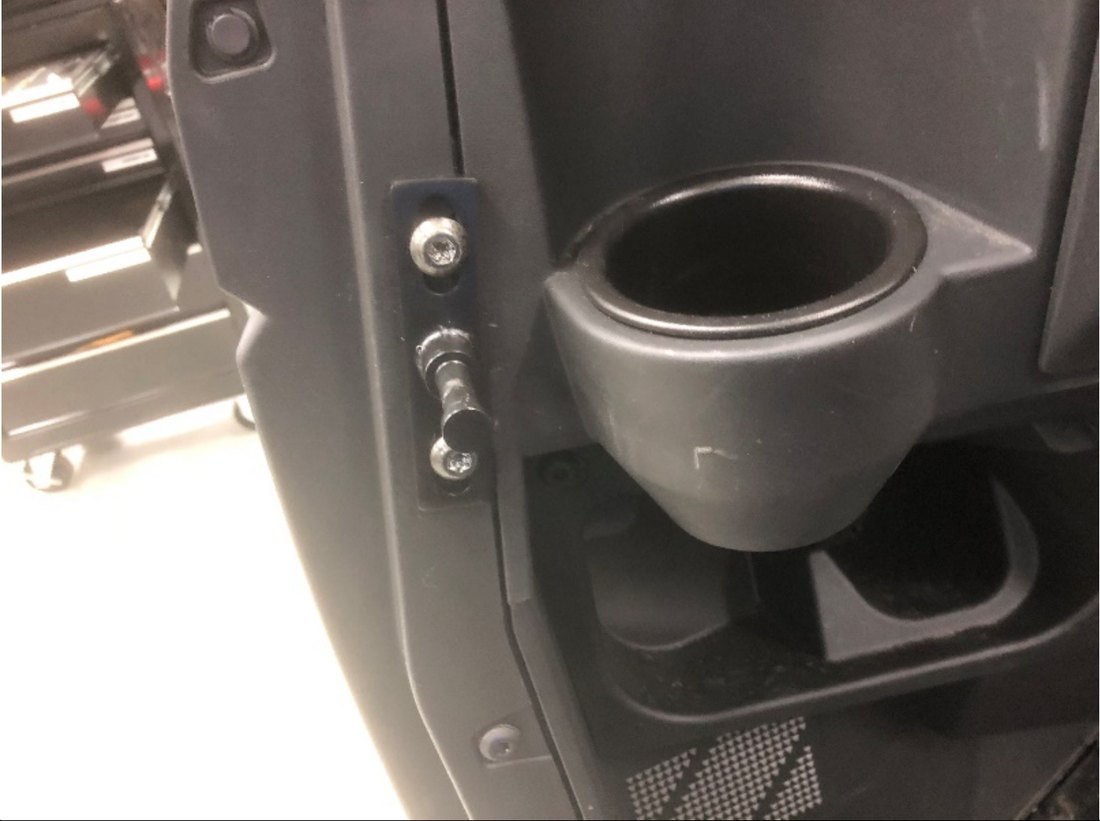
Striker centered and left loose for adjustment.
11 Remove the lower front net attachment
The lower front attachment and its plastic net retainer come off with two more T40 screws.
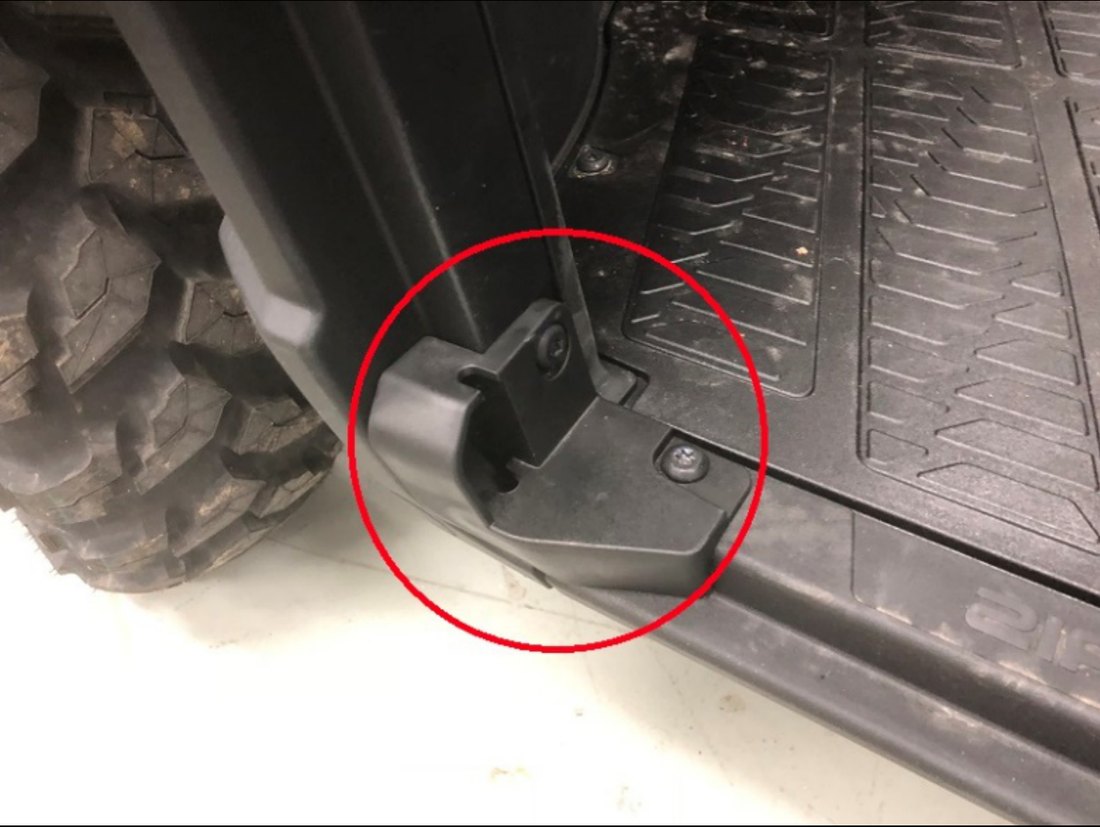
Lower front net attachment at the floor.
12 Remove the remaining net brackets and the nets
Four more locations, and they do not all use the same fastener. The lower rear bracket and the hip restraint bracket are T40 Torx. The bracket behind the seat uses an 8mm bolt and nut. The upper rear bracket uses an 8mm bolt and a nut plate — keep that nut plate, the upper vehicle hinge needs it in step 13.
With the brackets off, pull the side nets and put them somewhere safe.
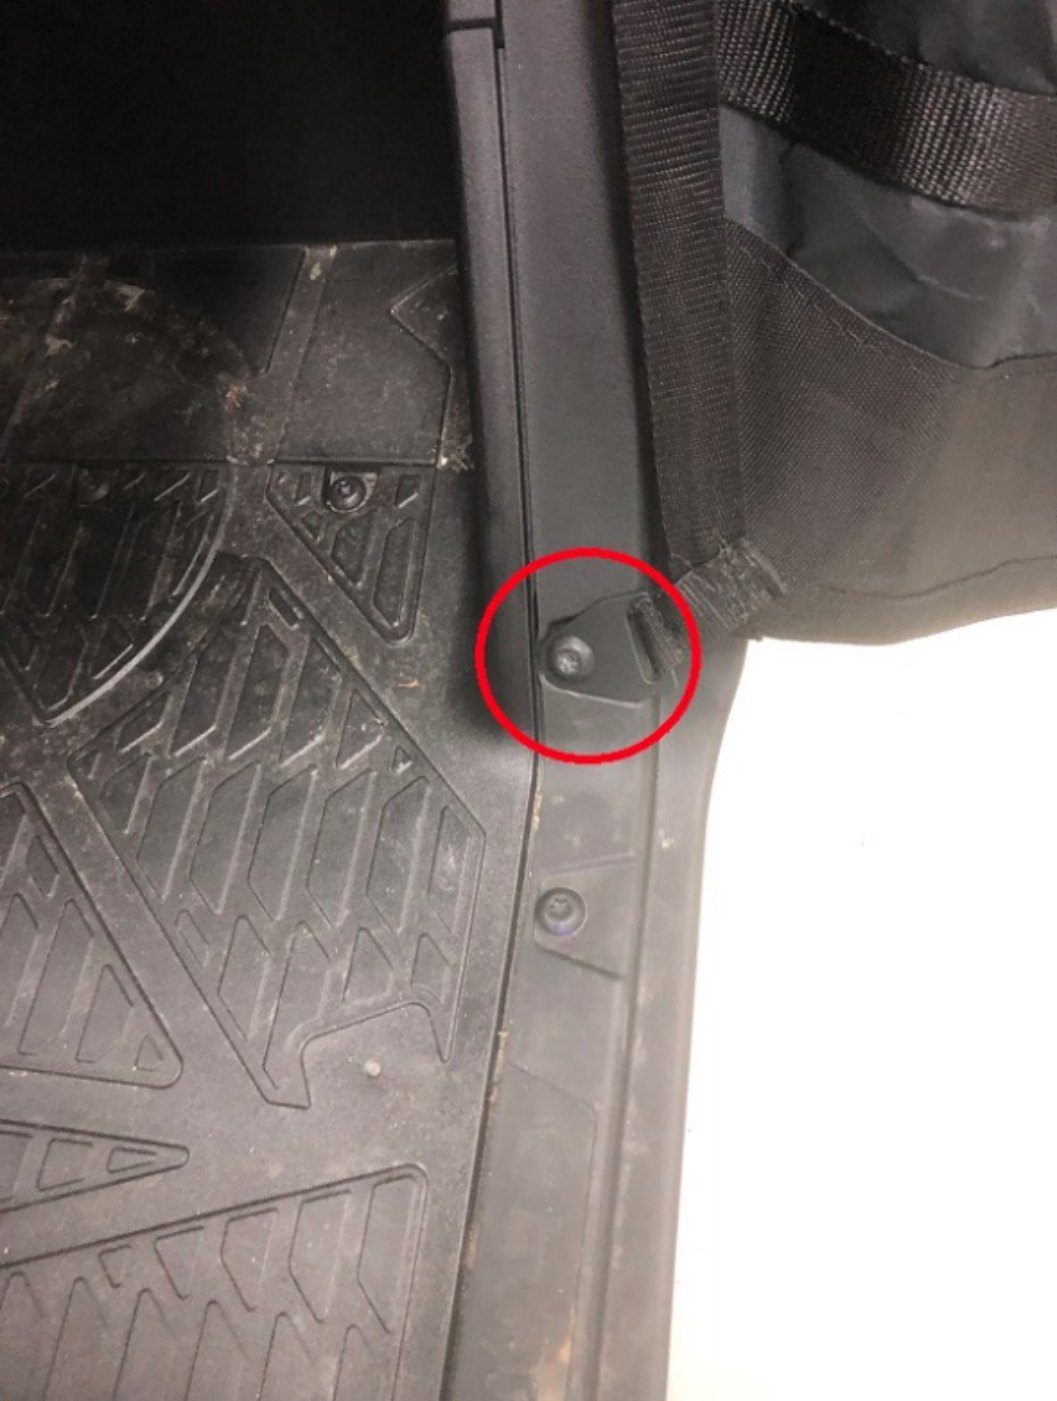
Lower rear net bracket.
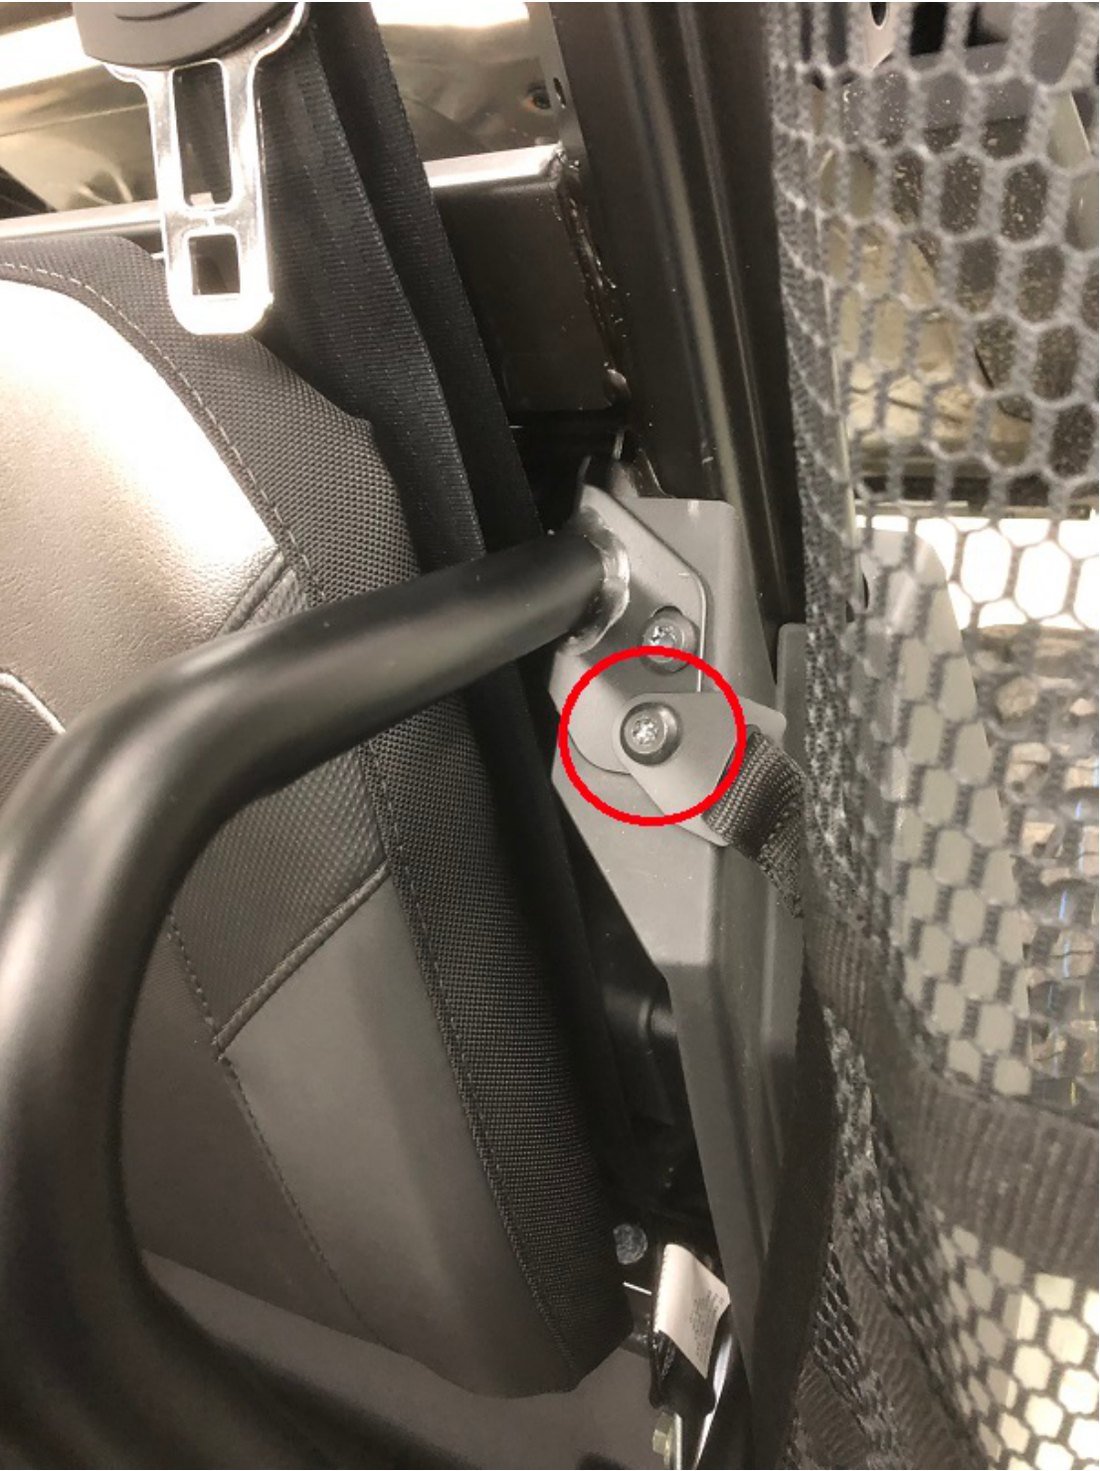
Behind the seat — 8mm bolt and nut.
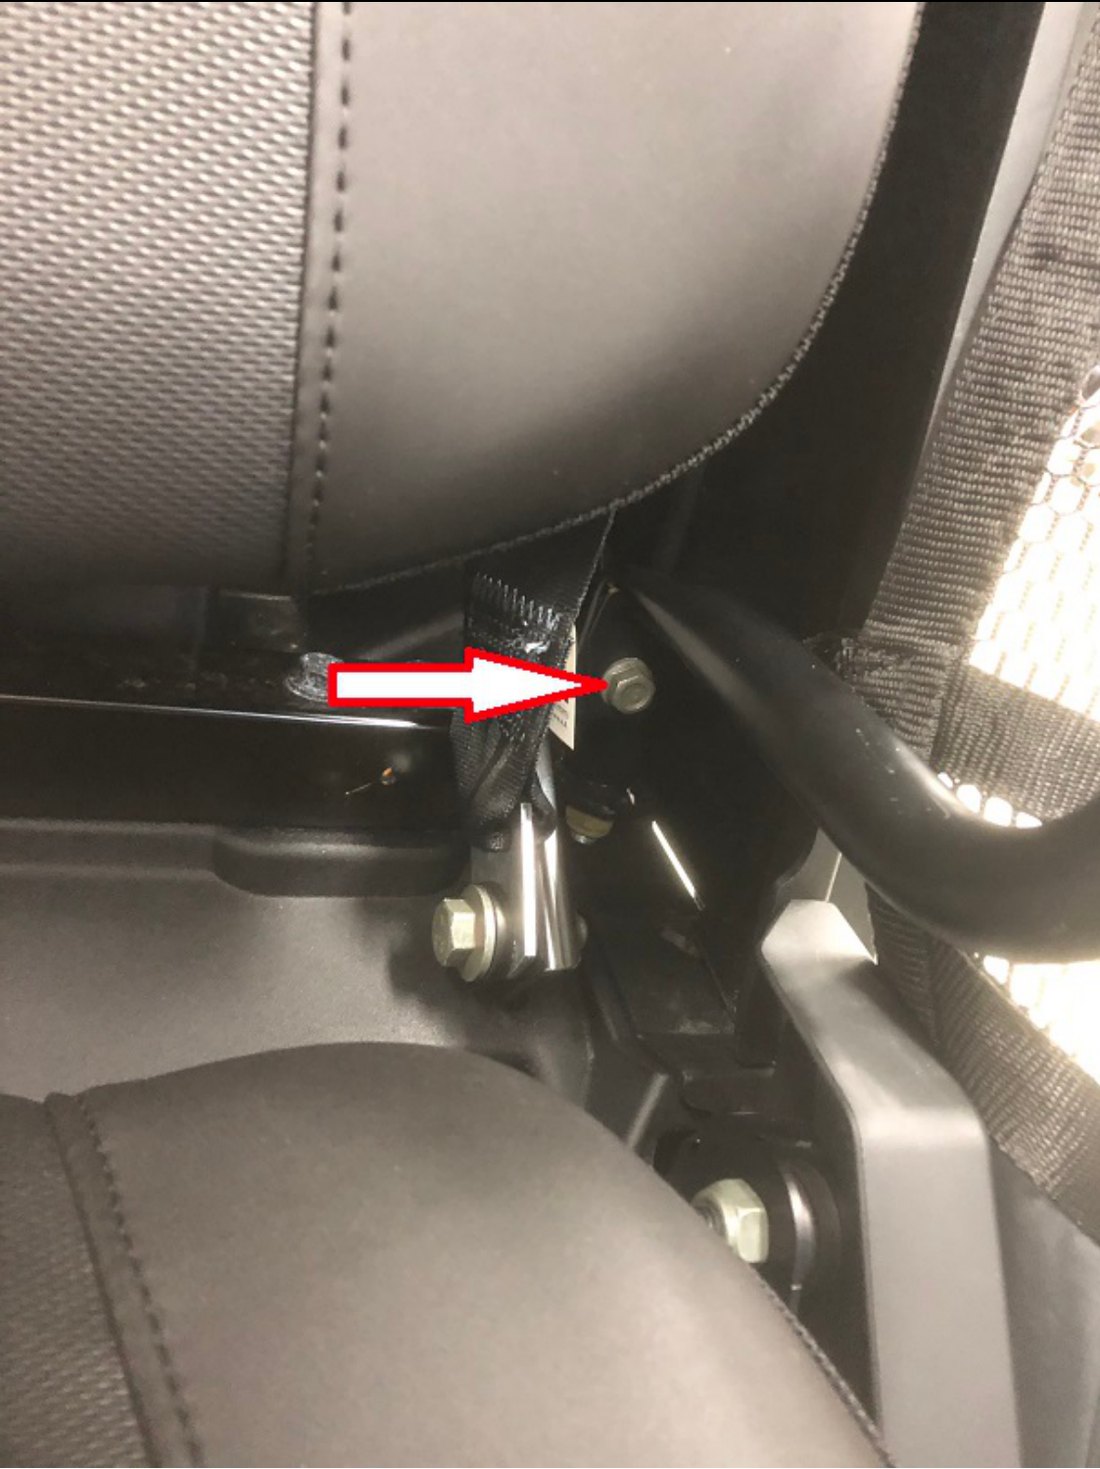
Hip restraint bracket.
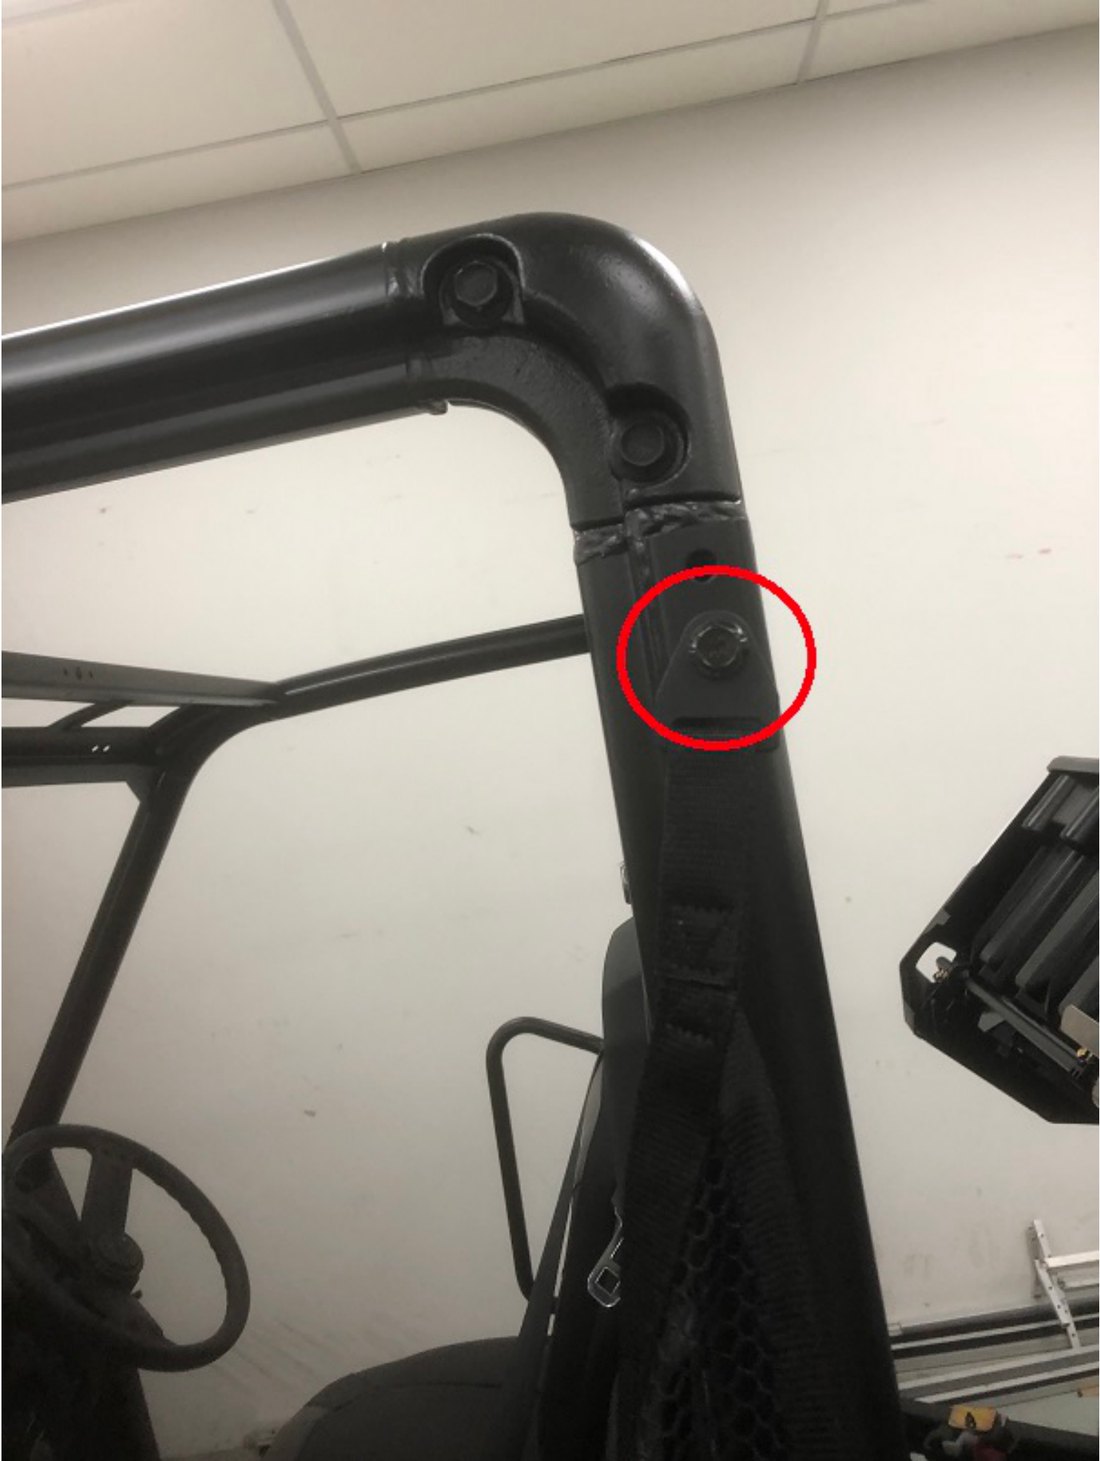
Upper rear bracket on the cage — save the nut plate behind it.
Part 3 — Hang the doors
13 Upper vehicle hinge — loose
Two T40 screws, two 8mm flat washers, and the nut plate you saved in step 12. Center the screws in their slots and leave them loose so the hinge can still move up and down. Drop one plastic washer over the hinge pin.
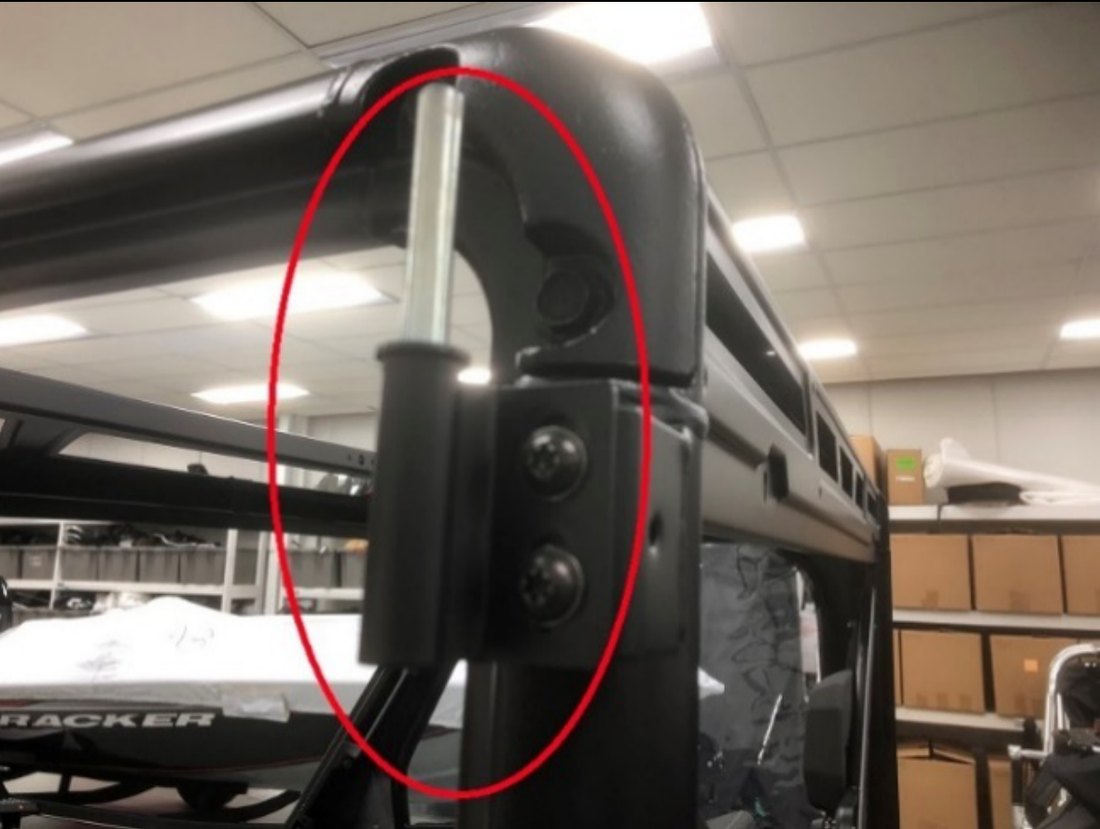
Upper vehicle hinge, screws centered in the slots.
14 Lower vehicle hinge — tight
Two T40 screws and six 8mm flat washers, and the washer arrangement matters: at each hole, one washer goes on the outside of the bracket and two go between the hinge and the vehicle as spacers. Get the spacing wrong and the door will not sit flush. These screws do get fully tightened. Plastic washer onto the pin.
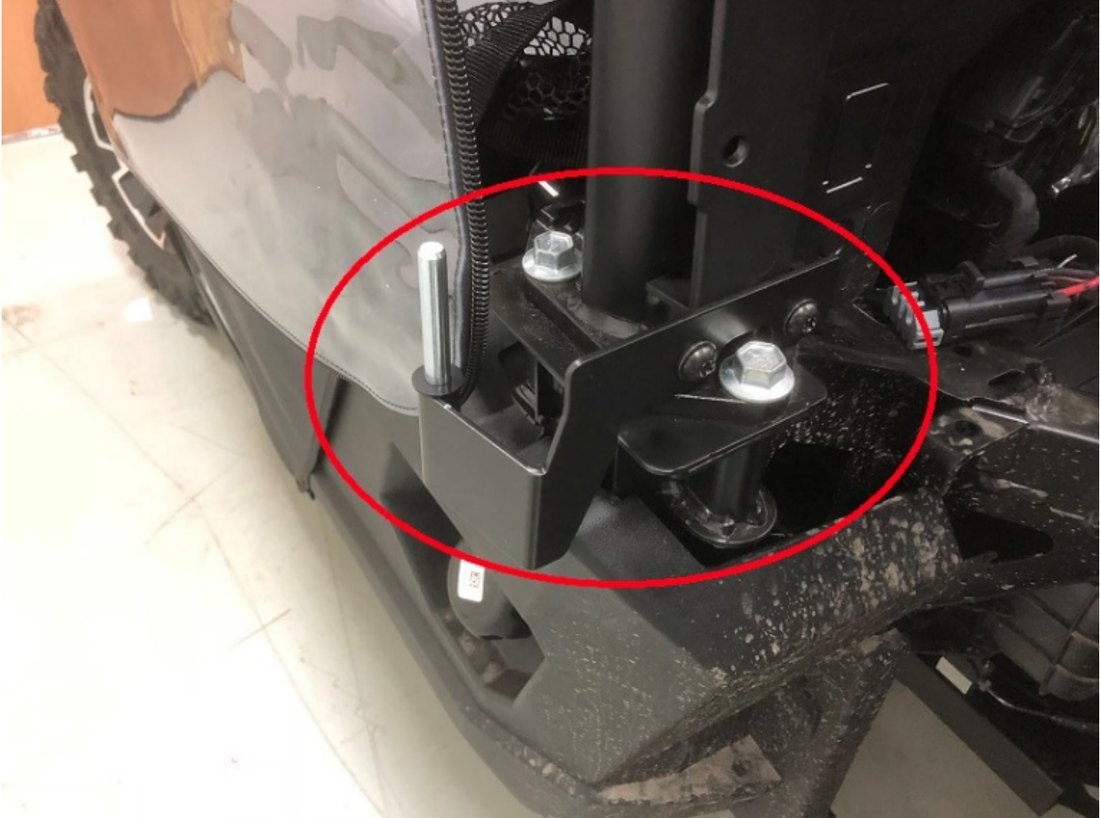
One washer outside, two behind as spacers. Tighten these.
15 Set the door into the frame
Lift the door into the opening and latch the rotary latch onto the striker. Position it centered in the frame, and move the latch and striker as needed to hold the front of the door closed and sitting right. Then zip-tie the top rear of the door to the cage so it cannot fall while you work on the hinges.
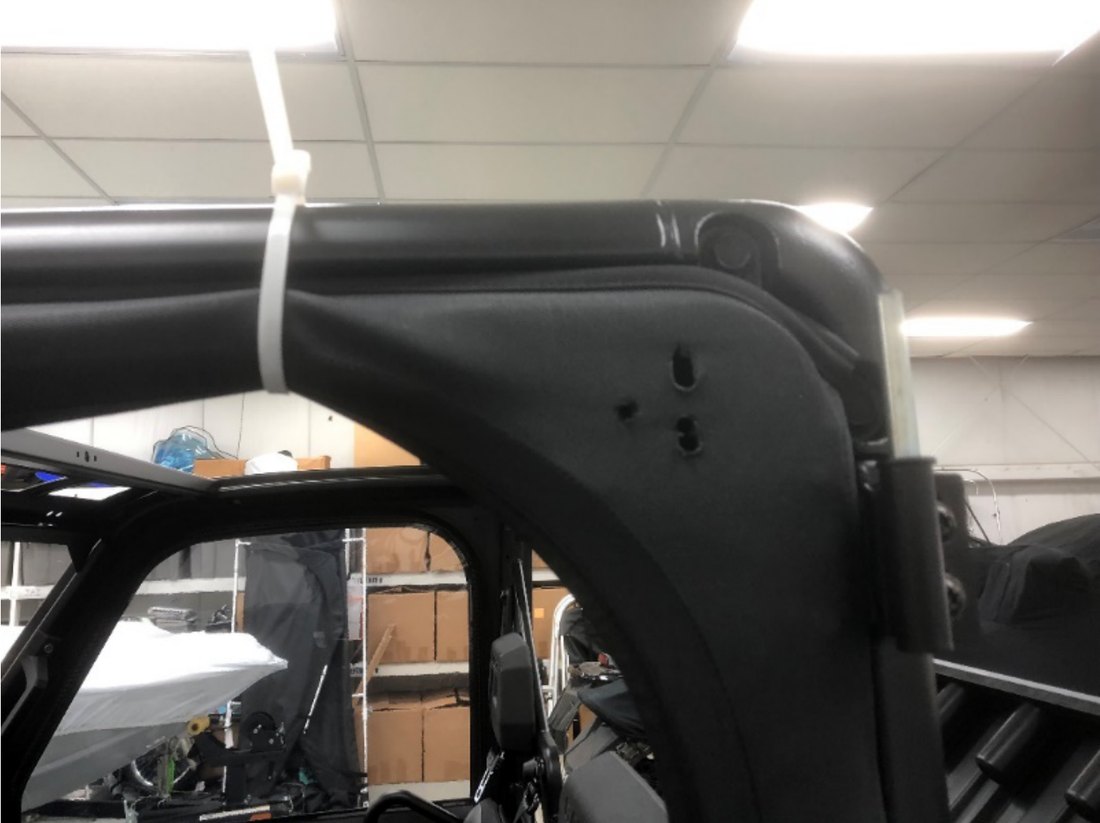
Door latched at the front, zip-tied at the top rear.
16 Upper door hinge — mark, burn, bolt
Set the upper door hinge onto the upper pin, on top of the plastic washer, oriented correctly. Press it against the door and feel through the fabric for the cutouts in the door frame plate. The frame plate is slotted vertically and the hinge is slotted horizontally, so you have adjustment in both directions — use it to get the door sitting right before you mark anything.
Mark the hole positions with the awl. Put the scrap wood between the frame plate and the inner door fabric before you burn, or you will melt straight through the inner skin. Burn the holes, then bolt the hinge on with three T40 screws, three 8mm flat washers on the outside of the hinge, and three 8mm lock nuts. These get fully tightened.
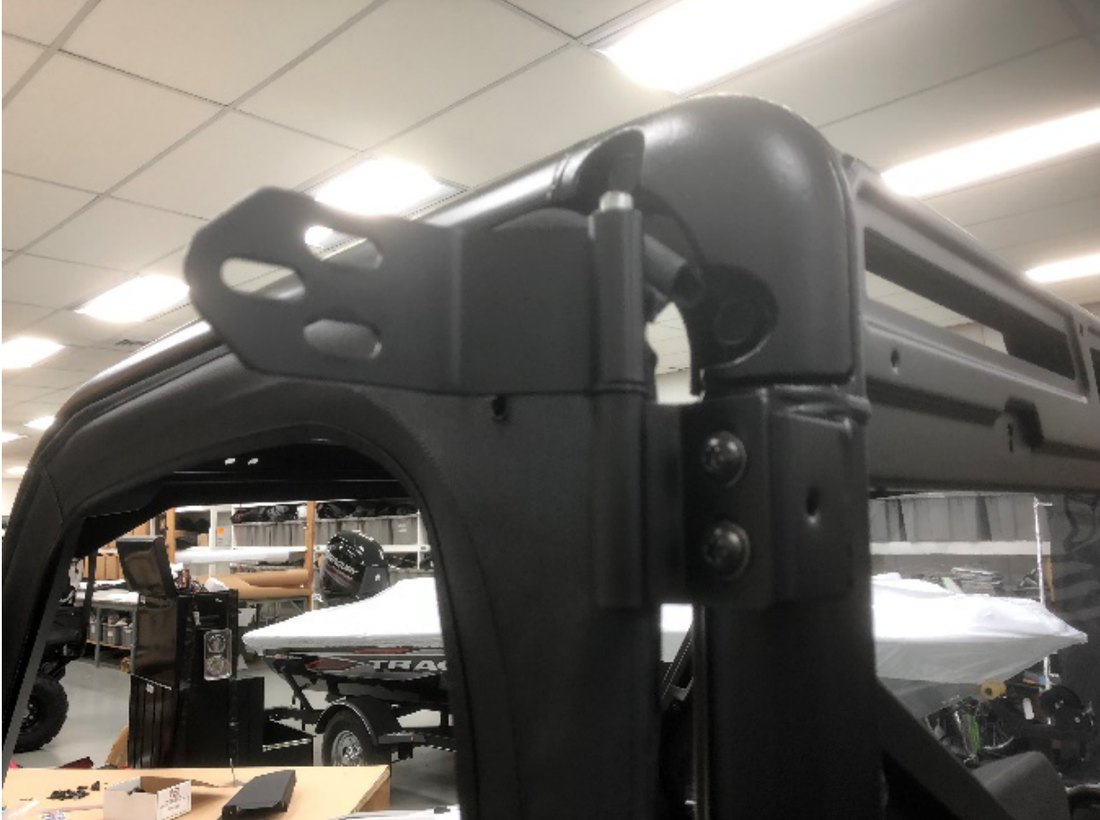
Hinge onto the pin, over the plastic washer.
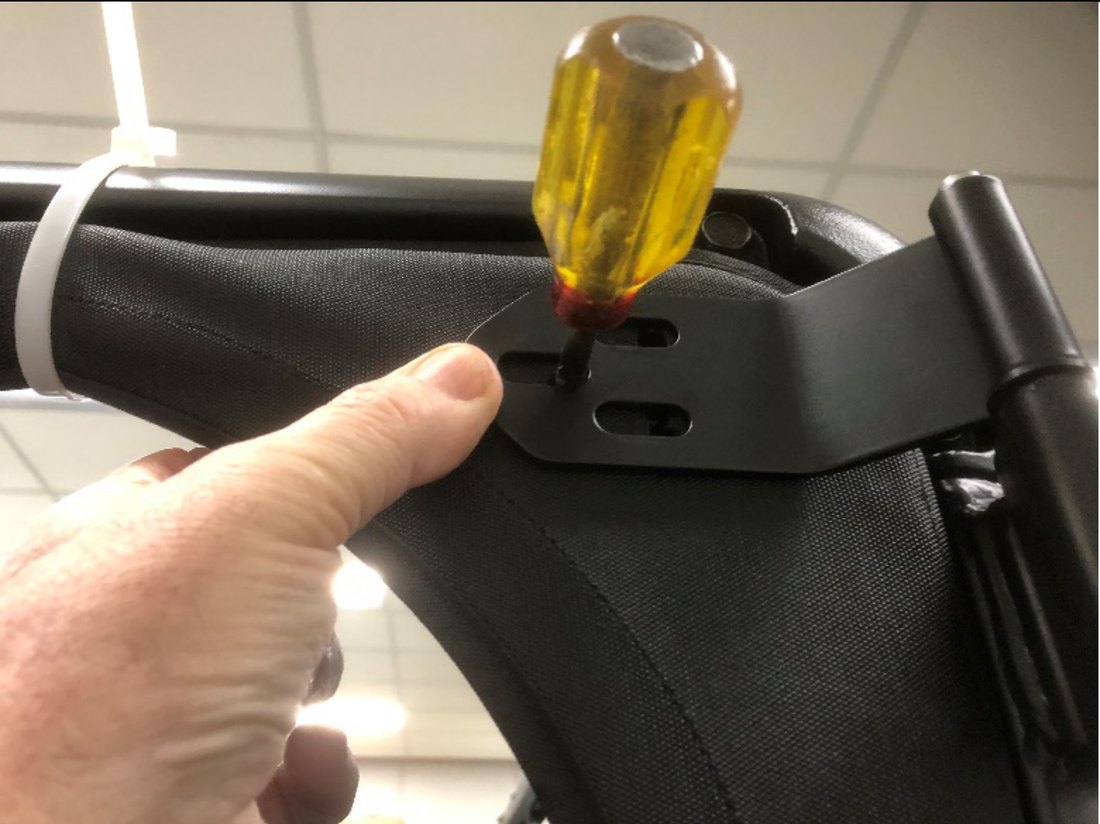
Marking hole positions through the slotted hinge.
17 Lower door hinge — same again
Onto the lower pin, over the plastic washer, correct orientation. Then repeat the mark-burn-bolt sequence from step 16, scrap wood included.
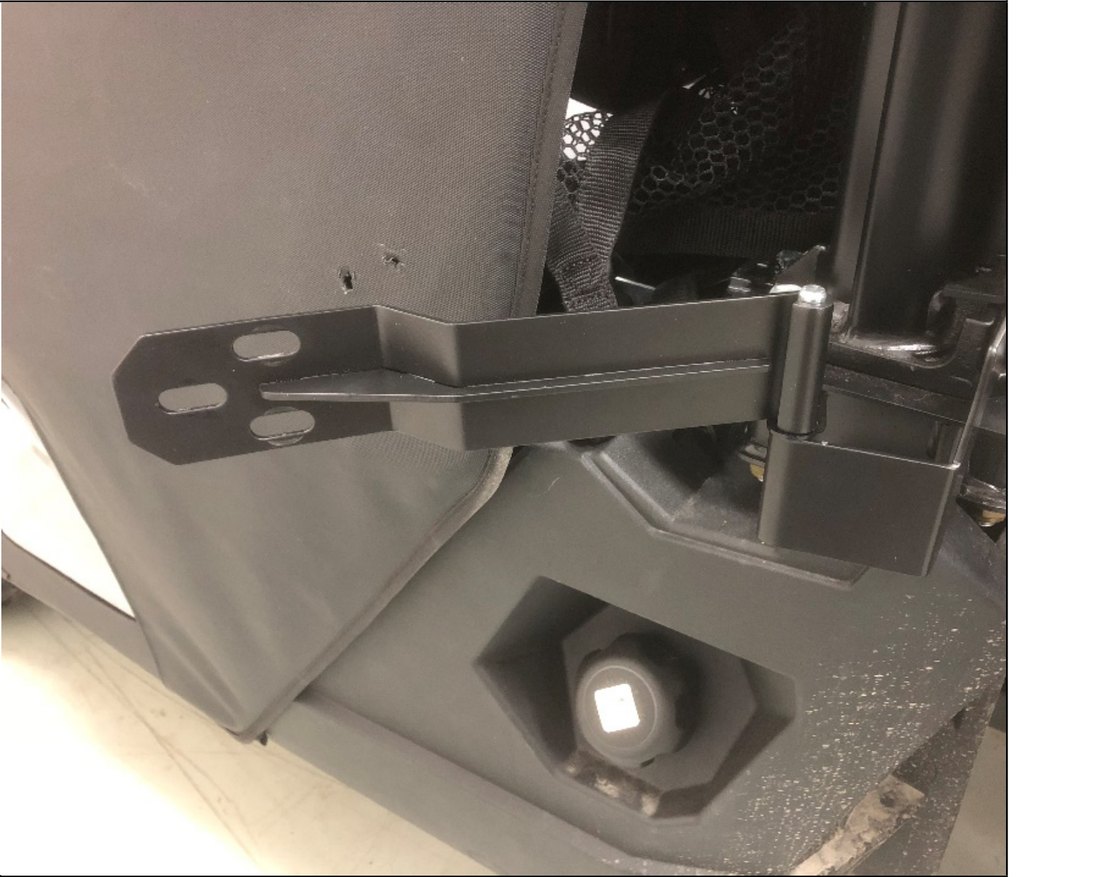
Lower door hinge on its pin.
Part 4 — Adjust and finish
18 Cut the zip tie and dial in the latch
The door should now hang on its rear hinges alone. Cut the zip tie. Zip the inner fabric zipper and the window zipper fully closed, tucking the excess zipper flap behind the inner door skin.
Now work the door. Open and close it using the latch from inside, and move the striker and rotary latch until the striker sits centered in the latch when closed. Check the seal from both outside and inside — you are looking for the door pulling tight to the frame with no air gaps.
The rotary latch has two positions. One click is half open. Two clicks is fully closed, and that is where it has to end up after your adjustments — a door that only reaches the first click will pop open on the trail.
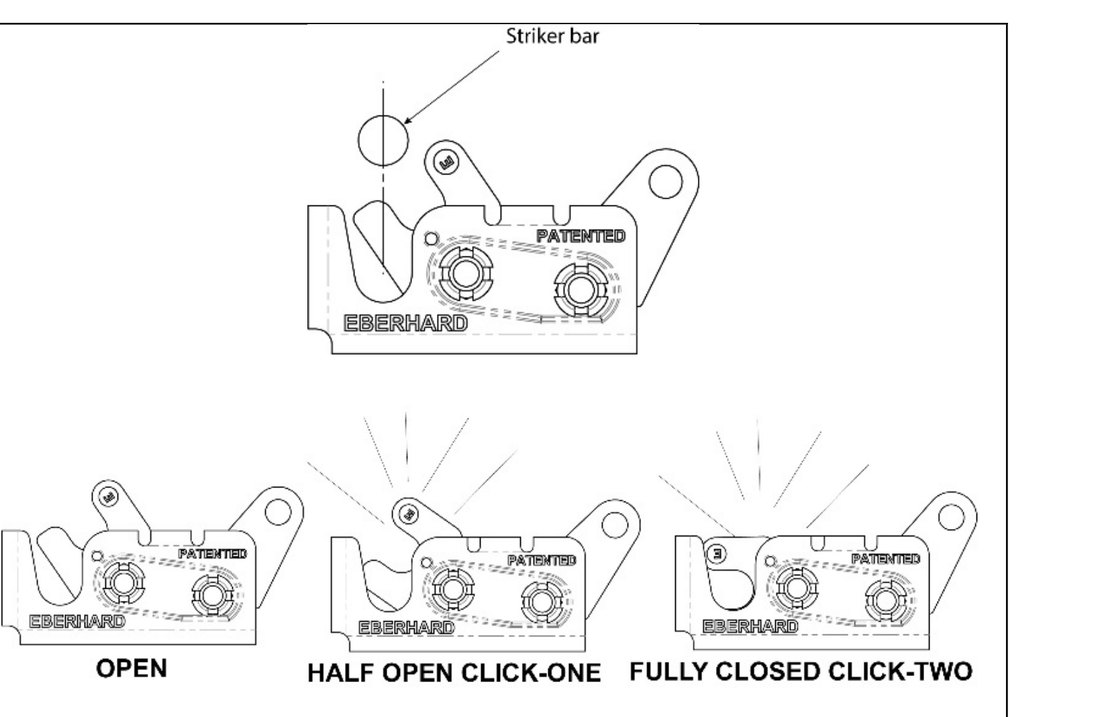
Open, one click, two clicks. Two is the only acceptable finish.
19 Foam grip on the handle
Adhesive inside the leading edge of the foam grip, then slide it onto the door handle.
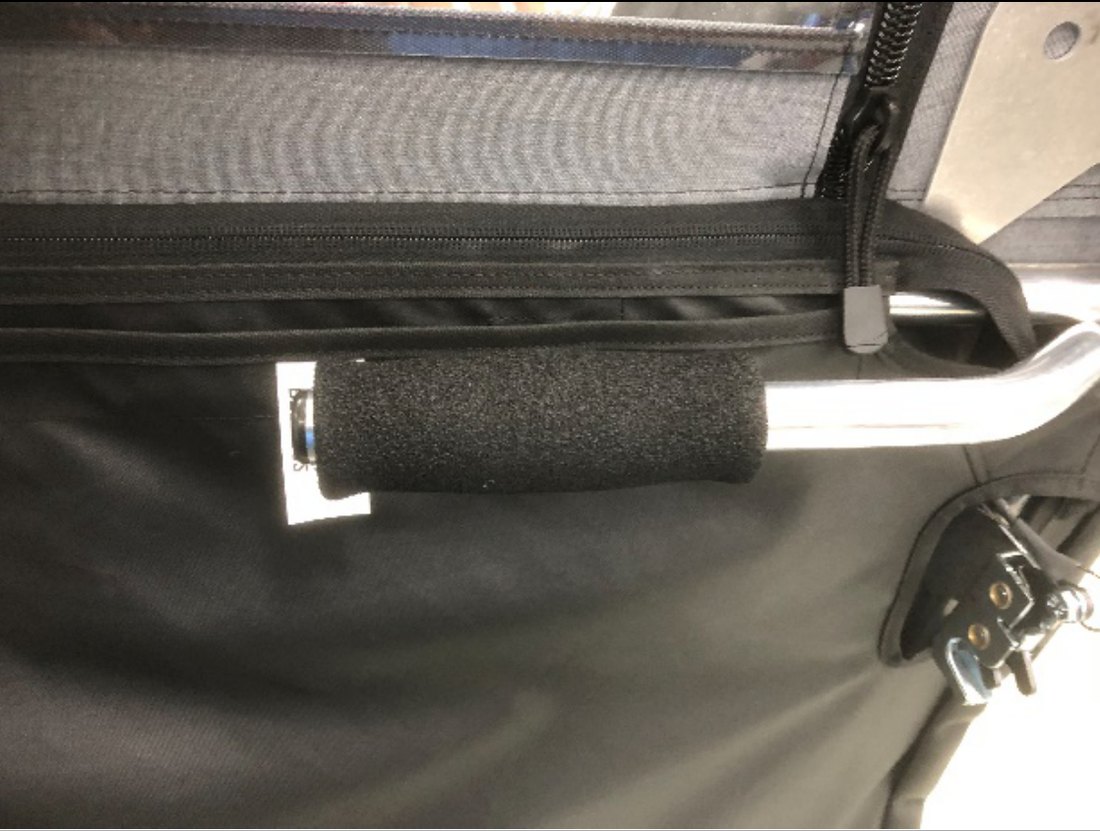
Foam grip onto the handle.
20 Connect the latch cable
Slide the shrink tubing onto the cable from the eye end you installed in step 7. Run the bolt with cable through the rotary latch lever, then the cable through the 6mm flanged bolt with the hole in it. Set the cable so it has a quarter inch of slack — pull it tight and the latch will not fully release — then lock it with a 6mm lock nut. Feed the cable end through the shrink tube, heat it to hold everything in place, and thread the knob onto the end of the cable bolt.
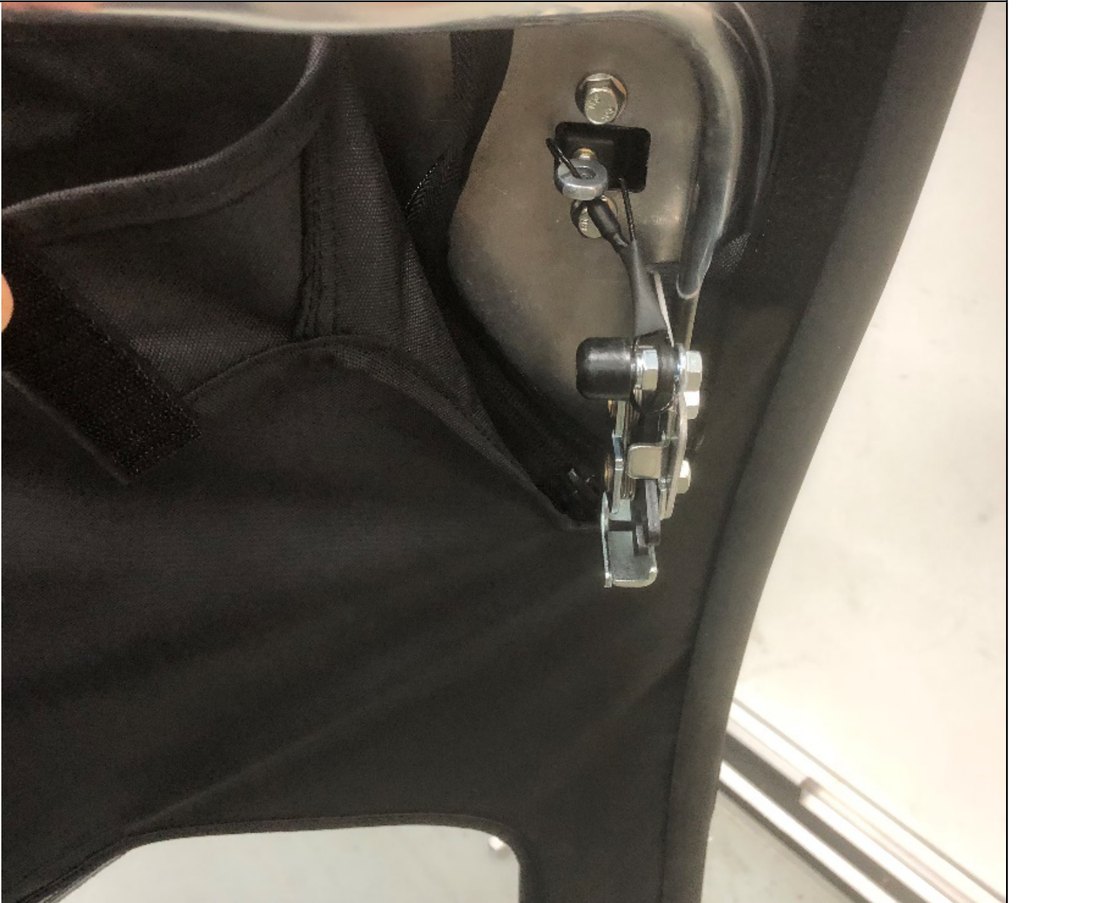
Cable to the latch lever, a quarter inch of slack.
21 Door limiter strap
Unzip the inner door zipper. Loop the strap around the lower frame tube near the hip restraint and feed the buckle end back through the loop on the strap end. Run the strap end through the opening in the inner door fabric, around the hip bolster, and back through the buckle. Adjust it so the door opens about 65 degrees.
This strap is what stops the door swinging into your fender. Do not skip it.
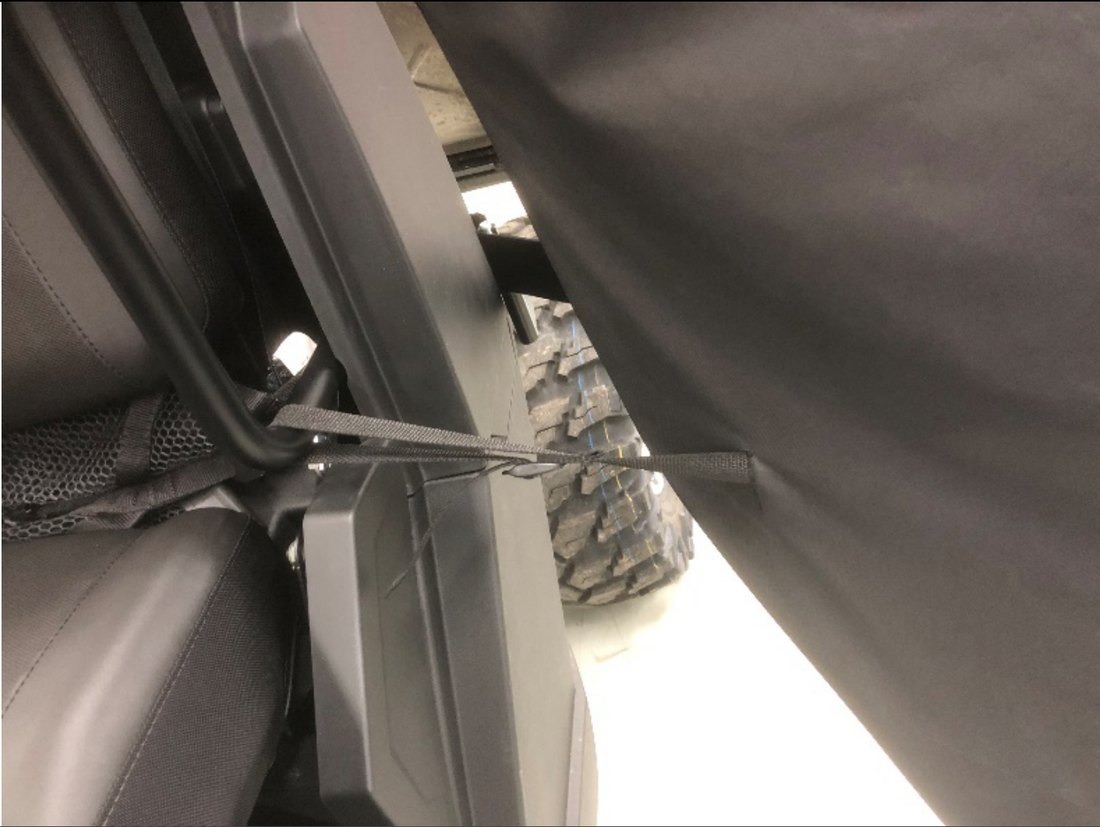
Limiter strap set for roughly 65 degrees of swing.
22 Final alignment, then tighten everything
Loosen the door hinges slightly if anything still needs to move, and set the door so it sits properly in the frame and opens and closes cleanly from both inside and outside. When you are happy with it, tighten every fastener on the door.
Then start over on the other side.
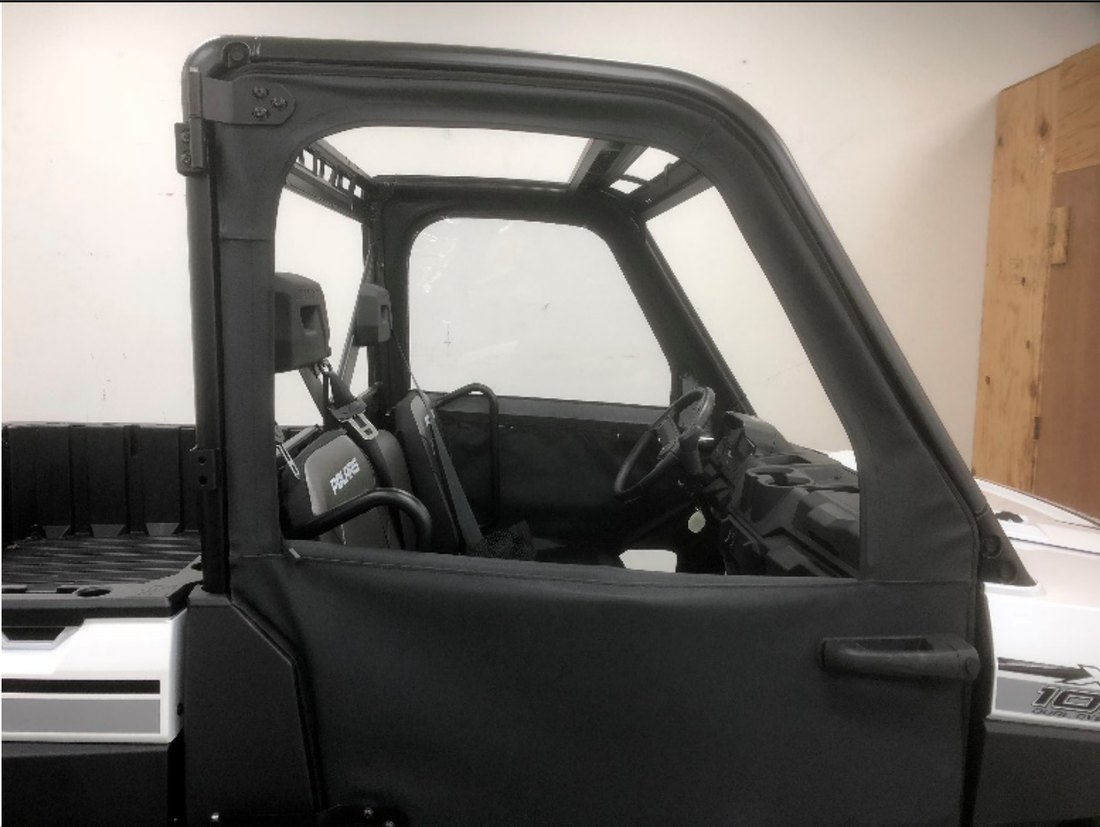
Door hung, sealed and tightened.
Accessories & Features
Side Mirrors
Both doors have a mirror mount built into the frame plate, and the mounts accept Spike and Seizmik mirrors. To use them, burn a hole through the fabric at the mount the same way you did in step 6 — scrap wood behind it, edges sealed.
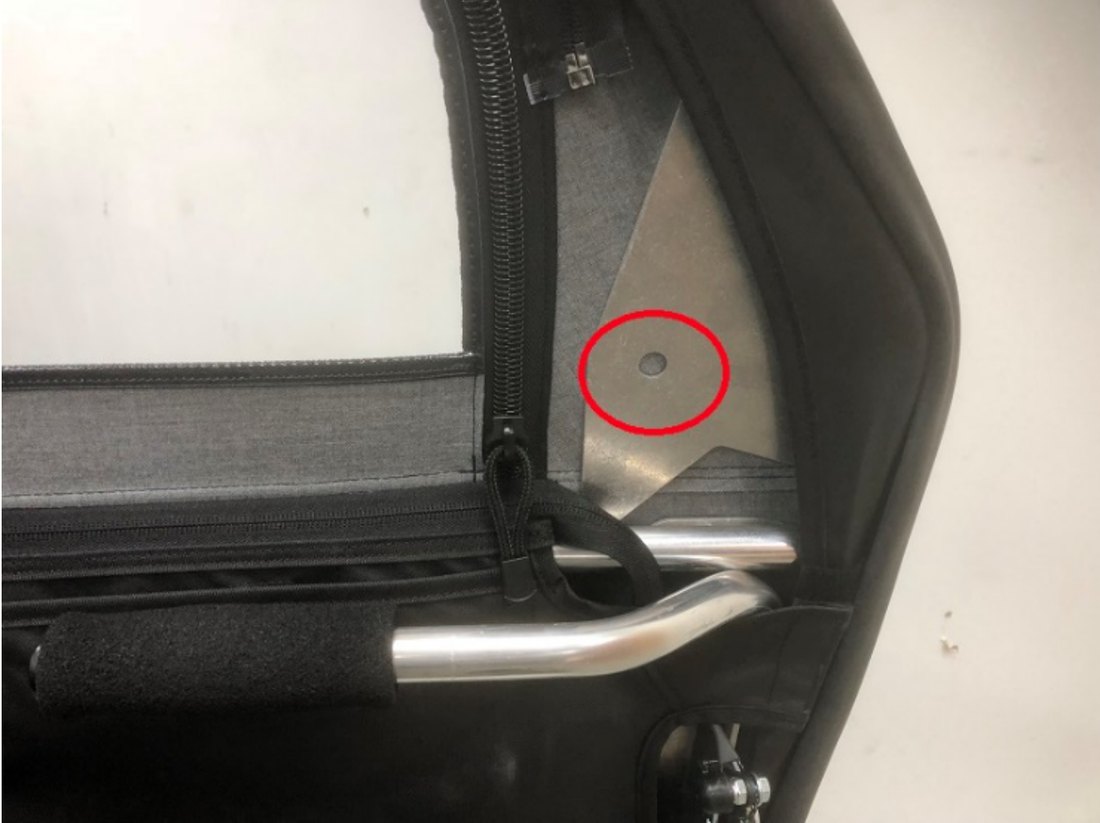
Mirror mount provision on the door frame.
Stowing the Windows
Unzip the window, fold it as shown, and tuck it into the door pocket. Press the inner door skin to the outer and the magnets hold it there — no rolling it up and strapping it like the factory doors.
One thing worth knowing before your first trip: if you trailer the machine on an open trailer with the doors on, unzip the windows and stow them. Highway air will work a closed window loose.
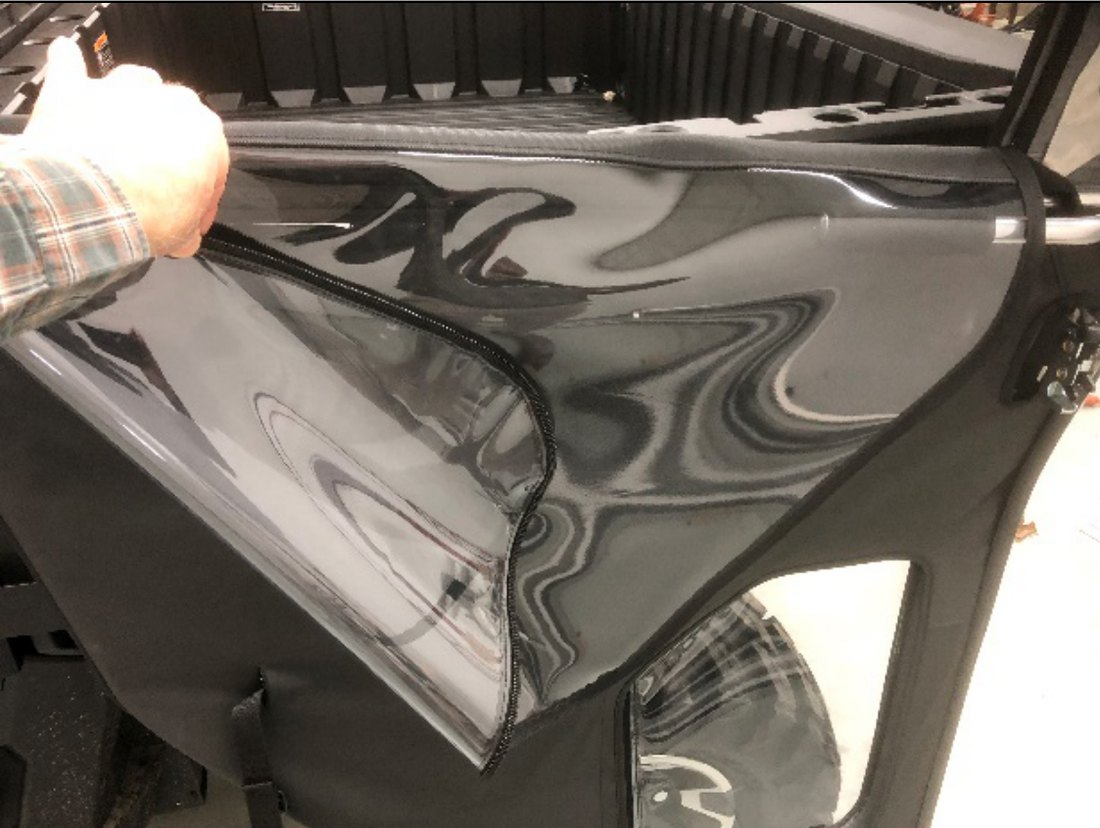
Fold the window before tucking it away.
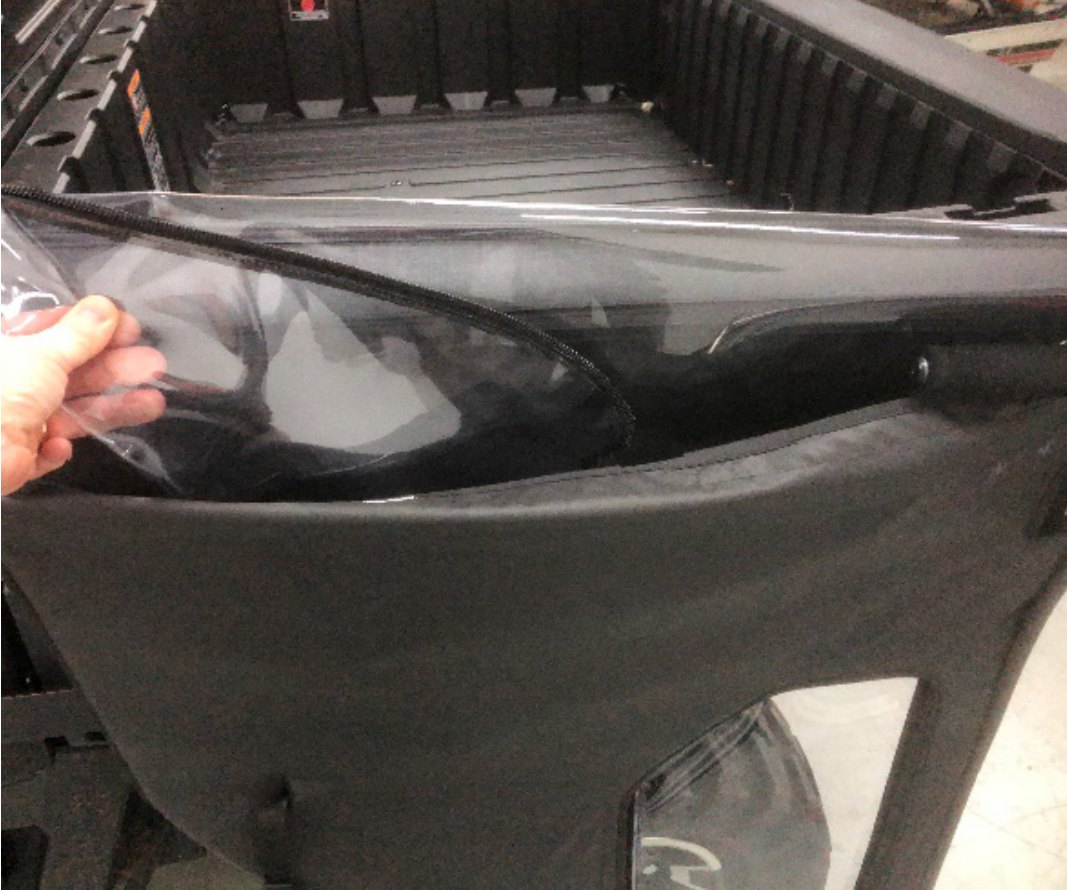
Tucked into the pocket, held by magnets.
Both windows stowed.
Troubleshooting & FAQ
Does this kit come with lower doors too, or just the uppers?
It builds two complete, full-height doors — one per side. The confusion comes from the parts list, which names an "upper door frame" and a "lower door frame" for each side. Those are the two halves of a single door frame that you join together in step 1. You are not getting four doors, and you are not getting uppers that bolt on over a factory lower.
I burned a hole in the wrong place. Can I fix it?
A small misplaced hole in the outer skin can be sealed with the soldering iron and will mostly disappear, but it will not close up completely. This is the reason step 5 exists — check the skin is centered and wrinkle-free before any heat touches it. If you melted through the inner fabric as well, Spike sells door skins separately, which is more than most manufacturers offer.
My door won't latch all the way and there's a gap at the top when it's closed. What did I do wrong?
Most likely you tightened the striker or the upper vehicle hinge too early. Both are slotted so they can slide, and that movement is the entire adjustment range you have. Loosen the striker screws and the upper vehicle hinge screws, work the door open and closed, and move the striker until it sits centered in the rotary latch and the latch reaches the second click. Tighten only once the door pulls tight to the frame with no air gap.
The latch won't release when I pull the inside knob.
The cable is too tight. It needs about a quarter inch of slack at the 6mm flanged bolt — pulled taut, the latch lever has nowhere left to travel. Back the lock nut off, reset the slack, and retighten.
Is it legal to run with my side nets removed?
Full doors are what replaces them, and the door has to be latched before you ride. Never run the machine with neither the doors nor the nets in place. Keep the nets and every bracket you removed — if you ever pull the doors off, the original hardware goes back on.
Will these fit my Ranger Crew?
No. The hinge locations on the Crew are different, and Spike does not make a door kit for any Ranger Crew model. We do carry other Crew door options — call us and we will point you at the right one.
I have a NorthStar. Can I still use these?
Your machine came with factory doors and powered windows, so there is nothing for this kit to replace. These doors are for machines that came with side nets.
Do I really need a soldering iron?
Not strictly, but it gives the cleanest result because it cuts and seals the fabric in one pass. A drill run in reverse is the accepted substitute — forward rotation grabs the weave and tears it — and you seal the edges afterward with a lighter. What you should not do is cut the fabric with scissors or a knife and leave it raw; it will fray and keep fraying.
How long does this really take?
Spike says about an hour. That is realistic for the second door, once you have done everything once. Give yourself an unhurried evening for the first one, and remember the adhesives want 24 hours before you ride.
Direct Resource Links
→ Door Kit Info & Fitment — Trailworx UTV Ranger XP 1000 Door Kit 58-9800
→ More Body Parts — Trailworx UTV Polaris Ranger Body Parts
→ Everything for the Ranger — Trailworx UTV Polaris Ranger Parts Catalog
Get the Ranger XP 1000 Door Kit — Part 58-9800 →
Not sure these are the right doors for your machine? Call 430-258-6189 or email sales@trailworxutv.com with your year and model and we'll confirm the fit before you order.